| Status | Date | Doc Version | Applicable | Confidentiality |
RELEASED | v2.4 | Wirepas Mesh v5.x | PUBLIC |
Important note
This document is only applicable to Wirepas Raspberry Pi prebuilt images version 1.3 onward.
Introduction
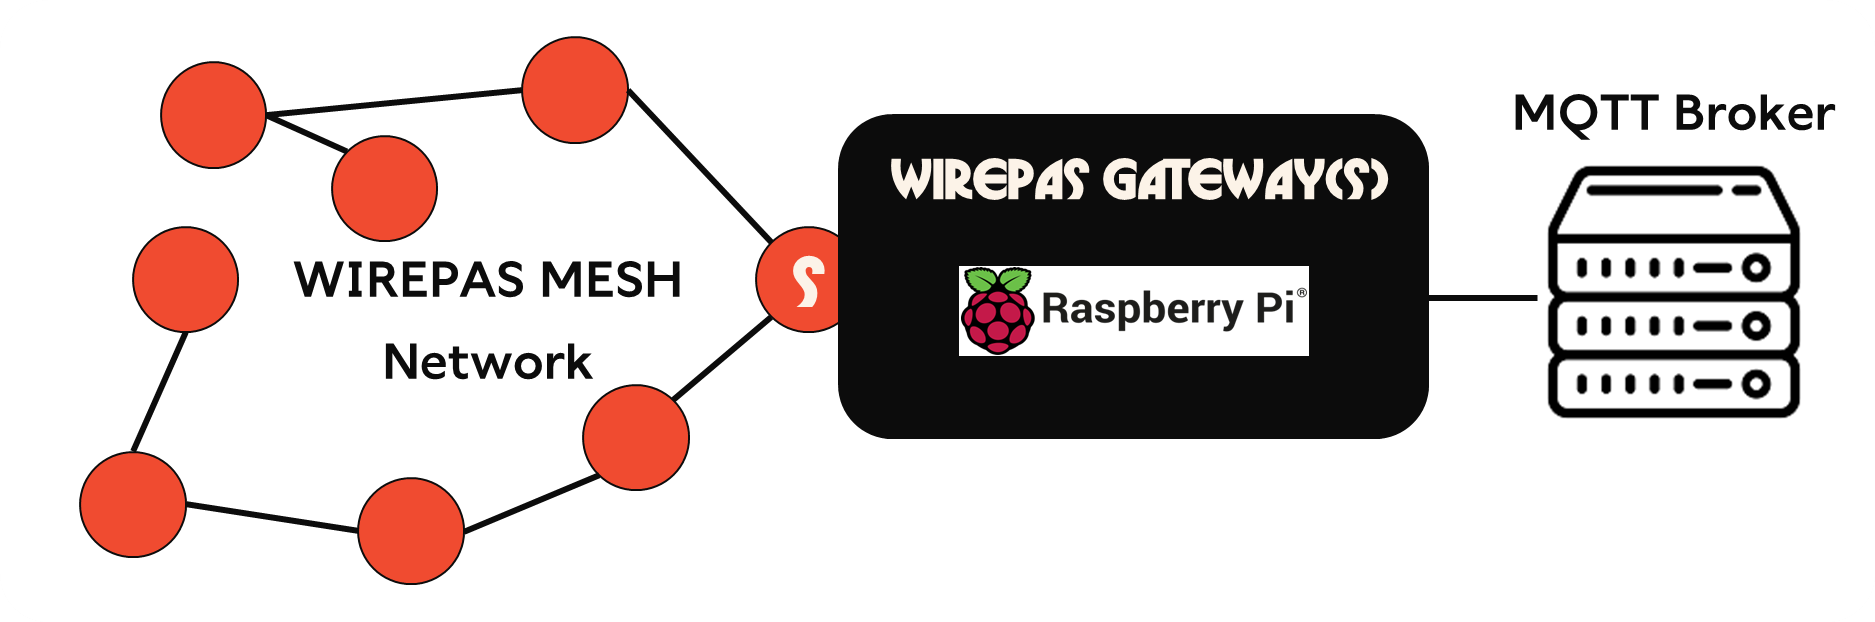
In this How-To, you’ll build a functional Wirepas Mesh Gateway using Wirepas prebuilt Raspberry Pi (RPi) images for evaluation. The Gateway will allow you to connect your local Wirepas Mesh network to a server using MQTT interface.
What you'll learn
- Building and Flashing a Raspberry Pi Image with Wirepas Gateway drivers
- Configuring the Wirepas Gateway Driver
- Configuring the Wirepas Mesh Sink node in the Gateway
- Test the Wirepas Gateway API over MQTT
- Understanding the Wirepas Gateway architecture
What you’ll need
Hardware:
- Raspberry Pi model v.3 or v.4 with appropriate power supply
- Micro SD-Card minimum 8GB class 10
- Micro SD-Card adapter depending on your PC configuration
- A Wirepas Sink connected to the Raspberry Pi via UART or USB and programmed with Wirepas Dual MCU Application.
- Use a supported silicon vendor reference board’ pointing to this link: Github Compatible Board List. Flash it with Wirepas Mesh Dual MCU Application.
Software:
- Balena Etcher software installed on your PC to flash the SD-Card: https://www.balena.io/etcher/
- Wirepas Raspberry Pi image (lite version) downloaded from Github (latest version) on your PC. Please note that the Full version with Desktop is provided for convenience. One should prefere the lite version.
- Optionally: a Wirepas NMS backend with credentials and NMS UI access. If you lack a Wirepas NMS, use the built-in local MQTT broker in the gateway to continue this How-To guide.
System:
The Raspberry Pi does not need to be connected to internet for initial setup. Nevertheless to be sure the latest gateway driver is installed and to be able to communicate with it via SSH and the MQTT broker we strongly recommend to still connect it to the internet.
By default the Raspberry Pi is enabled with Ethernet / DHCP which remains the preferred option to operate.
You can also use Wi-Fi which can be configured via multiple options:
- Using the Desktop image (non lite) with Screen and Keyboard/mouse connected respectively to HDMI and USB ports
- Using Headless setup (lite) with Command line
Please refer to the official tutorial for detailed instructions : https://www.raspberrypi.org/documentation/configuration/wireless/
Shall you need static IP or a more complex IT setup, please refer to the Raspberry documentation.
The required port accesses for this how-to guide are:
| Ports | |
RPi gateway |
|
Wirepas NMS as Wirepas backend (optional) |
|
Getting Started
In a nutshell, Wirepas Gateway is an open source implementation of Wirepas Gateway Drivers implementing a Gateway to backend communication via MQTT. The official repository is located here.
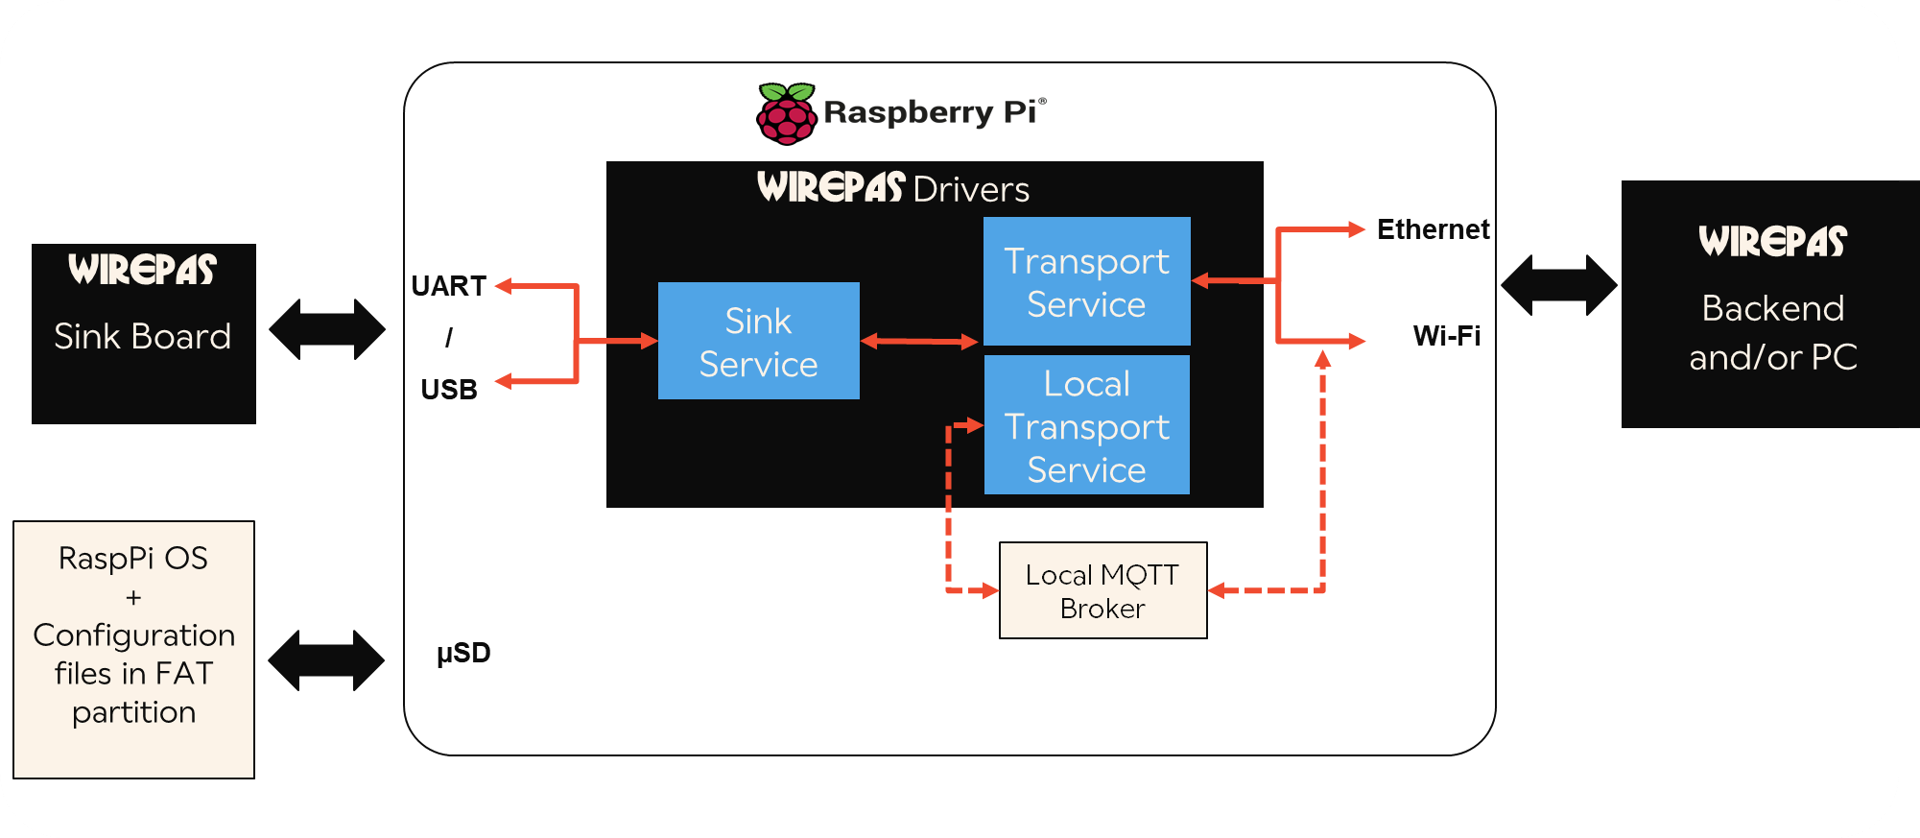
Wirepas Prebuilt Raspberry Pi image consists of a standard Raspbian image with:
- Wirepas Gateway driver based on a set of docker images (latest version)
- Scripts executed at boot to configure Wirepas Sink and the connection to a remote MQTT broker via text file located in the FAT partition of the Raspberry Pi SD-Card.
- A local MQTT Broker for test purpose in case the gateway is not connected to a server (Wirepas Backend or other MQTT Broker).
Shall you need more details about how the image is generated, please refer to the Github repository available here.
NOTE: This prebuilt image has been developed only for evaluation and prototyping purpose and is not targeted to be used in a production network. Default parameters are kept from all installed packages and images which can lead to security risks. More particularly, Wirepas default logins (from here) are kept, SSH is enabled by default and there are no credentials on the local Mosquitto MQTT broker. You need to pay attention on securing your Gateway upon your need.
In the next chapters you will create and configure the Gateway going through 4 steps:
- Prepare the Micro SD Card
- Configure the Wirepas Gateway Drivers and the Wirepas Sink
- Start the Raspberry Pi
- Check the Gateway
Prepare the microSD Card
- Plug in the micro SD card to your computer either directly or via an USB adapter
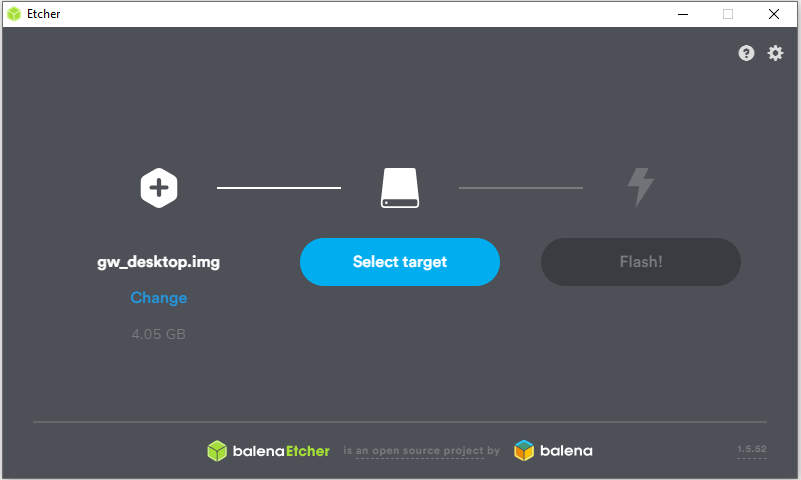
- Start Balena Etcher on your computer
- Select the prebuilt image, previously downloaded from Wirepas GitHub repository
- Select the micro SD card as target, and click “Flash!”
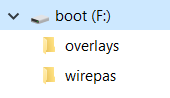
At the end of the flashing process unplug and replug the micro SD card to your PC. You should see a new drive called “boot” with several files and a “wirepas” directory
The Raspberry Pi image is now programmed. In next Chapter we will configure it with the Wirepas Gateway and Sink settings
Configure the Wirepas Gateway Drivers and the Wirepas Sink
Wirepas Gateway driver and sink configuration can be fully managed via text file located in the micro SD card. It avoids the need to connect to the gateway via screen or SSH to input parameters.
To do so, download the sample configuration files from Wirepas Github Repository:
- gateway.env is used to configure the Sink and Transport services
- sink.env is optional and can be used to configure the sink node locally
Configure your gateway.env
The gateway.env file is used to configure the Wirepas Gateway drivers (sink and transport service) as described here. The configuration file includes 3 parts: driver version selection, Sink service configuration and Transport service configuration.
For the MQTT connection, the Raspberry Pi image provides by default a local MQTT Broker that runs permanently. You have also the possibility to configure a connection to your own MQTT broker as explained below.
Open the file gateway.env
- on your computer with a text editor like Notepad application to reflect your configuration (don’t use Wordpad as it will change the file encoding which shall be UTF-8).
- using your preferred editor if you are on the Raspberry Pi already (in /boot/wirepas)
Configure the docker images version to use
#
# Select the version of wirepas Gateway to use:
#   - "latest" (default if  not set): the gateway will use the latest official release,
#     and at each reboot, the gateway will check if there is a new release to upgrade
#   - "edge":  the gateway will use the top of gateway master branbch. At each reboot,
#     the gateway will check if there is a new release to updgrade
#   - "v1.3.1", "v1.4.0"...: any tag available from docker hub
#
GATEWAY_TAG=
The GATEWAY_TAG shall be set to latest as it will keep the Wirepas gateway driver up to date at each gateway reboot.
If for any reason you need insure the version in use do not get updated then you can set the tag to any specific version listed here. We recommend you to use the latest one if you are starting with Wirepas products.
Configure the sink service
#
# Sink service configuration
#

# On which port the sink is attached (ex: /dev/ttyACM0 or /dev/ttyAMA0 if using a rpi hat)
WM_GW_SINK_UART_PORT=
# Uart bitrate of the sink. It depends on the build configuration of dualmcu_app (ex: 115200, 125000, 1000000)
WM_GW_SINK_BITRATE=
The sink service needs 2 parameters:
WM_GW_SINK_UART_PORTshall be configured with the peripheral on which the Wirepas Sink board is enumerated on the Raspberry Pi (usually /dev/ttyACM0)WM_GW_SINK_BITRATEshall be set with the baud rate configured in the board (at compilation time).
Default configuration is 125000 bauds/s:
Edit both WM_GW_SINK_UART_PORT & WM_GW_SINK_BITRATE in your editor to reflect your configuration
Configure the transport service
# Gateway unique id (used also as mqtt client name)
# If left blank, id will be automatically generated as a uuid based on your hardware
# Id can be any string as long as it is unique in your network.
WM_GW_ID=

#
# Transport service configuration
#

# For full set of parameters, please refer to:
#   https://github.com/wirepas/gateway/tree/master/docker/docker-compose#transport-service

# Address of the broker to connect
WM_SERVICES_MQTT_HOSTNAME=
# MQTT port (usually 8883 for secure access, or 1883 for unsecure)
WM_SERVICES_MQTT_PORT=
# Username to connect to broker
WM_SERVICES_MQTT_USERNAME=
# Password to connect to broker
WM_SERVICES_MQTT_PASSWORD=
# Uncomment following line to skip TLS check on brocker (uncomment it for local brocker)
#WM_SERVICES_MQTT_FORCE_UNSECURE=true
The transport service configuration includes the parameters for the MQTT broker server and Gateway ID.
Gateway unique id configuration
The Gateway Unique ID is used to identify a Gateway in the Wirepas Gateway API (see: Wirepas Gateway API)
You can edit the WM_GW_ID upon your preference or keep the default setting which will generate a unique ID based on your Raspberry Pi hardware.
Remote MQTT Broker example
Below a configuration example with Wirepas NMS Backend
#
# Transport service configuration
#

# For full set of parameters, please refer to:
#   https://github.com/wirepas/gateway/tree/master/docker/docker-compose#transport-service

# Address of the broker to connect
WM_SERVICES_MQTT_HOSTNAME=<Your NMS instance hostname or your MQTT broker host/IP>
# MQTT port (usually 8883 for secure access, or 1883 for unsecure)
WM_SERVICES_MQTT_PORT=8883
# Username to connect to broker
WM_SERVICES_MQTT_USERNAME=<Your User Name>
# Password to connect to broker
WM_SERVICES_MQTT_PASSWORD=<Your Password>
# Uncomment following line to skip TLS check on brocker (uncomment it for local brocker)
#WM_SERVICES_MQTT_FORCE_UNSECURE=true
In case of a Wirepas NMS Backend, NMS MQTT broker credentials should be delivered by your admins.
The MQTT broker credentials (username/password) to use are the ones defined for the “mqttgatewayuser”.
Note1: In case you want to use your own MQTT broker with unsecure access you need to:
- Set the
WM_SERVICES_MQTT_PORTto your MQTT broker unsecured port, typically 1883 - Uncomment the parameter
WM_SERVICES_MQTT_FORCE_UNSECURE=true
Note2: In case you use a secure connection, you need to comment the line #WM_SERVICES_MQTT_FORCE_UNSECURE=true
Remote MQTT broker configuration example
#
# Sink service configuration
#

# On which port the sink is attached (ex: /dev/ttyACM0 or /dev/ttyAMA0 if using a rpi hat)
WM_GW_SINK_UART_PORT= /dev/ttyAMA0
# Uart bitrate of the sink. It depends on the build configuration of dualmcu_app (ex: 115200, 125000, 1000000)
WM_GW_SINK_BITRATE= 125000

# Gateway unique id (used also as mqtt client name)
# If left blank, id will be automatically generated as a uuid based on your hardware
# Id can be any string as long as it is unique in your network.
WM_GW_ID=my_first_wirepas_gw

#
# Transport service configuration
#

WM_SERVICES_MQTT_HOSTNAME=<Your NMS instance hostname or your MQTT broker host/IP>
# MQTT port (usually 8883 for secure access, or 1883 for unsecure)
WM_SERVICES_MQTT_PORT=8883
# Username to connect to broker
WM_SERVICES_MQTT_USERNAME=mqttgatewayuser
# Password to connect to broker
WM_SERVICES_MQTT_PASSWORD=<mqttgatewayuser password>
# Uncomment following line to skip TLS check on brocker (uncomment it for local brocker)
#WM_SERVICES_MQTT_FORCE_UNSECURE=true
Configure your sink.env
On your own computer, edit the sink.env in the same way as gateway.env file to reflect your configuration.
Below a configuration example
#
# Initial Sink configuration
#

# Node address of the sink (Ex: 0x12345 32 bits max can be Hex or Decimal)
WM_CN_NODE_ADDRESS=0x12345
# Network address (Ex: 0xA1B2C3 24bits max  can be Hex or Decimal)
WM_CN_NETWORK_ADDRESS=0x123456
# Network channel (Ex: 2 valid numbers 1-40)
WM_CN_NETWORK_CHANNEL=2
# 16 bytes authentication key for the network (Ex:000102..0F leave empty if not used)
WM_CN_AUTHENTICATION_KEY=
# 16 bytes cipher key for the network (Ex:000102..0F leave empty if not used)
WM_CN_CIPHER_KEY=

# Set node role to sink csma-ca (shouldn’t be changed)
WM_CN_NODE_ROLE="sink csma-ca"
Note: sink.env file will be automatically renamed to sink.success if the setup is properly applied to the sink at boot. In case you want to change your sink settings or if you connect a new sink, sink.success will not be applied until you rename it to sink.env.
Copy configuration files to uSD Card
When both gateway.env and optionally sink.env are ready, copy them to the uSD card in the wirepas folder. Once done eject the uSD Card and insert the card to the Raspberry Pi.
Start the Raspberry Pi
- Connect the Wirepas sink
- 1 - Make sure you have your sink board flashed with Wirepas Dual MCU application that can be found here: Github - Dual MCU Application.
- 2 - Connect your sink to a USB port on your Raspberry Pi.
- Connect other peripherals: uSD, Ethernet (with Internet access), optionally HDMI, USB keyboard and mouse.
- Connect power cable

Board startup
At boot the software will automatically:
- Resize the file system
- Reboot
- Install the Wirepas Gateway drivers (docker images pre-stored on the SD-card). Takes few minutes upon your SD card write speed
- Note:
- if you did not specify any docker image tag version in the gateway.env file or the tag version is set to latest at the next reboot the gateway will try to download and install the latest driver version available.
- in that case we recommend you to reboot the gateway once after the initial automatic configuration step is over
- Note:
- Configure the Wirepas Drivers as per the gateway.env and sink.env files
- Start the Wirepas gateway driver docker services
During the initial setup the Raspberry Pi will reboot once which is normal.
You can validate the drivers installation ended successfully by checking that all the docker images are started with
docker ps
and by checking that the output is similar to this
CONTAINER ID   IMAGE                                      COMMAND                  CREATED       STATUS        PORTS     NAMES
e4ba05123041   wirepas/gateway_transport_service:latest   "wm-gw"                  2 weeks ago   Up 39 hours             transport-service
40cf4d8774eb   wirepas/gateway_transport_service:latest   "wm-gw"                  2 weeks ago   Up 39 hours             transport-service-local
bcfd915787ae   wirepas/gateway_sink_service:latest        "stdbuf -oL -eL /hom…"   2 weeks ago   Up 39 hours             sink-service
76e277c459d1   wirepas/gateway_dbus_service:latest        "/etc/init/entrypoin…"   2 weeks ago   Up 39 hours             dbus
You must have four containers running:
- sink-service
- transport-service
- transport-service-local
- dbus
For additional information about the role of each container please have a look here.
Check the Gateway
You can check that your configuration is successful using the Wirepas MQTT console, alternatively using Wirepas Network Tool client if you have a Wirepas backend.
Using the Wirepas MQTT Console
Wirepas MQTT Console is a web client to connect to your MQTT Broker (either the local one, a Wirepas Backend or your own broker running on your server). It is available to be downloaded locally on your machine directly (Wirepas MQTT Console Local Downloads) or from your favorite Web browser (Wirepas MQTT Console). The former is better suited for testing on the local MQTT Broker, whereas the later is better suited for the remote MQTT broker testing.
- Note 1: For the Web browser version, as the tool is hosted on an HTTPS domain, web browsers prevent downgrade of security by default. In case of a security warning pop-up, you can use the standalone version of the Wirepas MQTT Console (see Note 2) or recent Firefox with network.websocket.allowInsecureFromHTTPS as true from about:config settings page: use at your own risk.
- Note 2: If you download the local version, first unzip the downloaded archive, open the public folder, and open the index.html file in your favorite web browser. Unzipping the archive is mandatory for the Wirepas MQTT Console to operate normally.
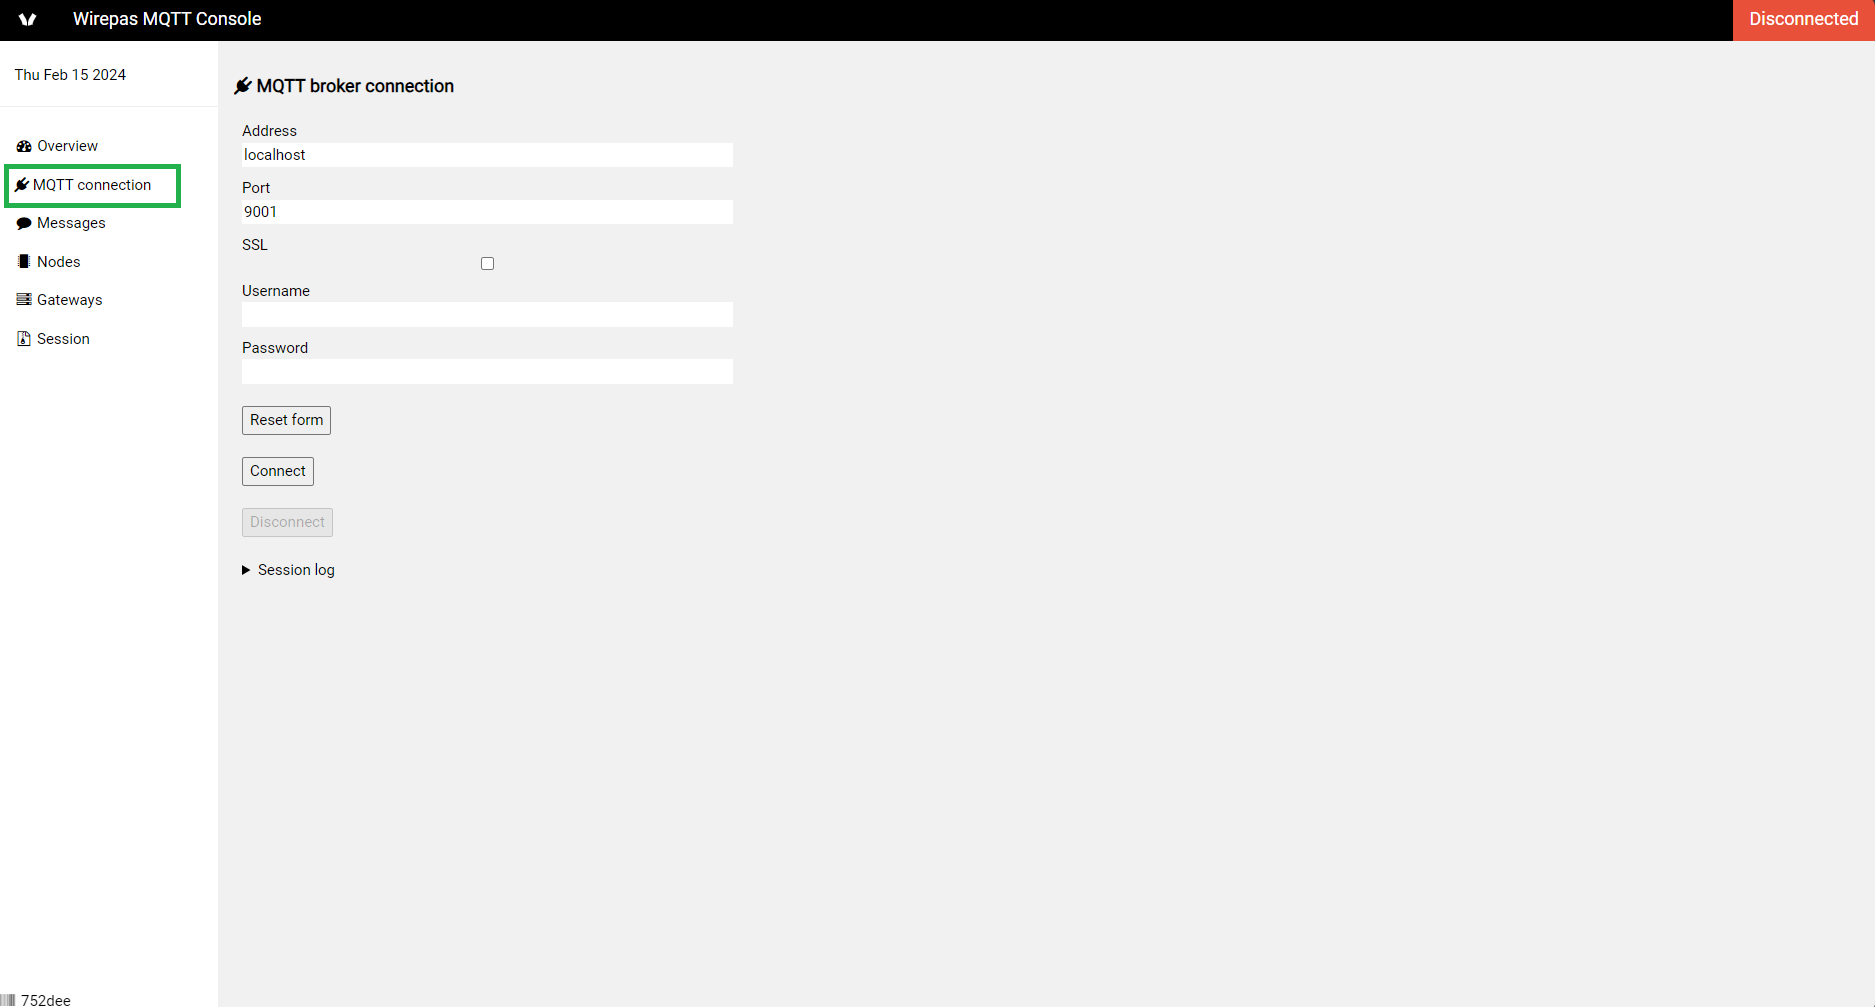
As per the sake of simplicity, we are only detailing the unsecured connection to your gateway.
1 - Enter the Raspberry Pi IP address if you use the local MQTT Broker. By default the Raspberry Pi is configured with DHCP enabled. To get the IP address of your Raspberry you need to get the allocated IP address from your DHCP server. Alternatively you can use tools like Angry IP Scanner or follow the tutorial from the Raspberry Pi foundation.
2 - Once configured you should be able to connect to the broker.

You should then see your gateway appearing in the Gateway panel.
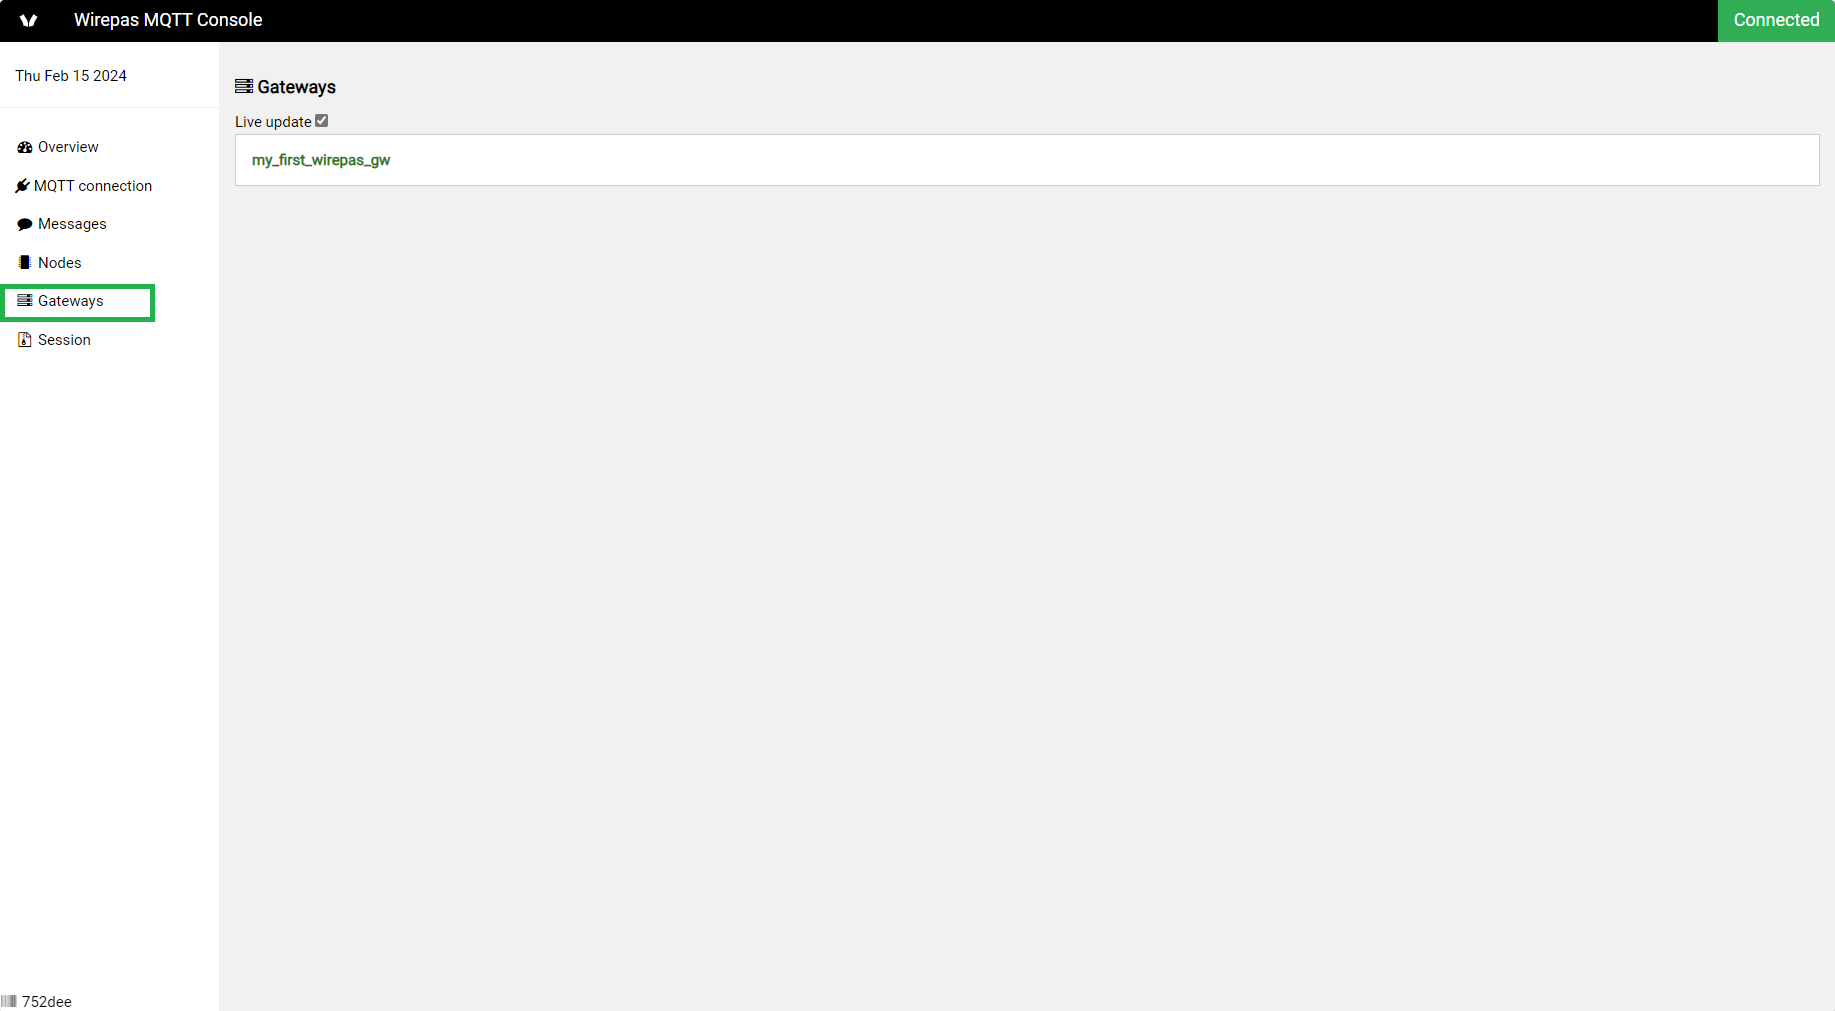
If you see this result it means your gateway is properly configured.
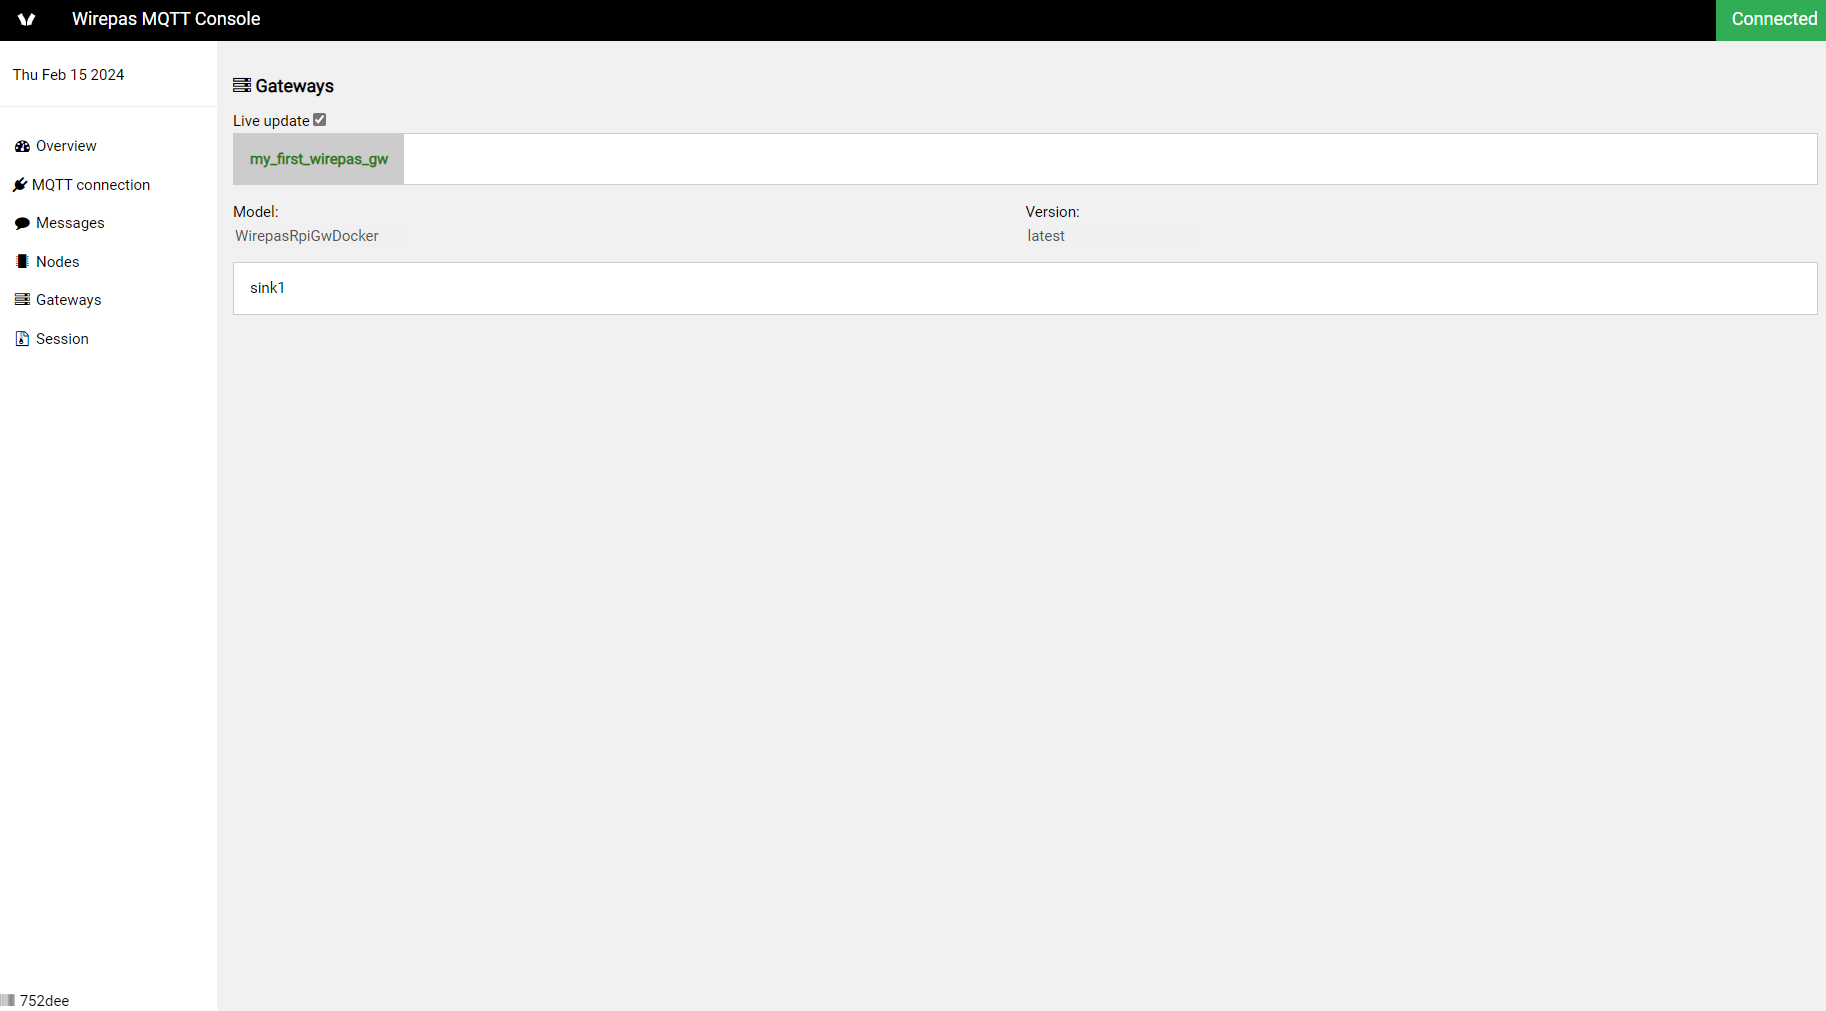
If you click on the available gateway, your sink should also appear. If not, please consider checking your sink is correctly connected.
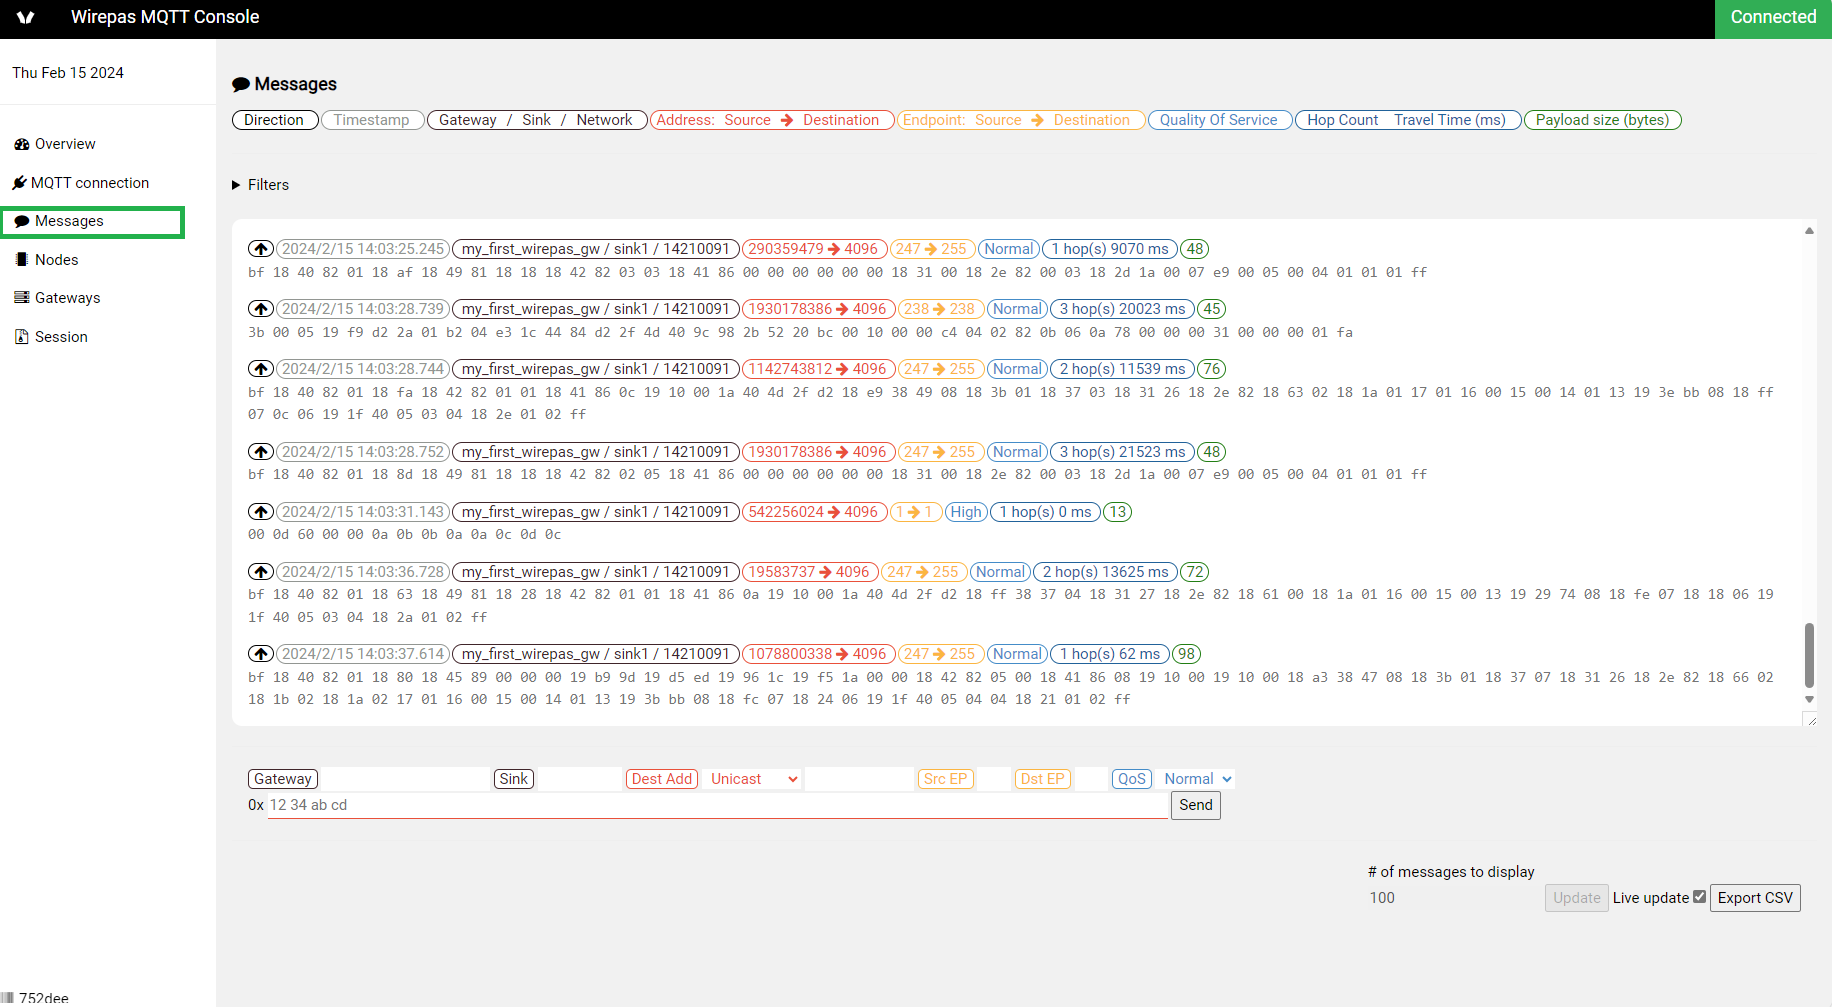
If your sink is visible, select the Messages panel, you should see the log from the Wirepas nodes, if you have any (additional to the sink).
Using NMS
Please refer to the Wirepas NMS System Administration And Maintenance User Guide for user access management and NMS User Guide for web client usage. If you do not have direct access to NMS backend, you might ask your NMS administrators to provide the required credentials for both UI and NMS MQTT broker.
FAQ
Can I connect to the Raspberry Pi via SSH
Yes, SSH is enabled by default, you can use software like Putty to install a SSH client on your PC. Once you have it you need to get the IP address of your Raspberry Pi either on your network. You can also use a terminal window straight on the Raspberry Pi if you use the Desktop image and have connected screen & keyboard.
Username and password are by default: login: wirepas / password: wirepas_pw
I have installed everything but it is not working
The root cause can come mainly from 2 reasons:
- Sink not properly flashed - Make sure your sink is flashed with Dual MCU application compatible with you platform.
- Wirepas Gateway drivers are not running:
- To test status you should connect via SSH to the Raspberry Pi and check if both the Sink and Transport services are running.
- To do so run the following command:
docker ps
- then in the output (example given below) check the status in the “STATUS“ column. You should see both services running for about the same time
CONTAINER ID   IMAGE                                      COMMAND                  CREATED        STATUS        PORTS     NAMES
146cec538a72   wirepas/gateway_sink_service:latest        "stdbuf -oL -eL /hom…"   24 hours ago   Up 24 hours             sink-service
3b60b0ab69bc   wirepas/gateway_transport_service:latest   "wm-gw"                  25 hours ago   Up 24 hours             transport-service
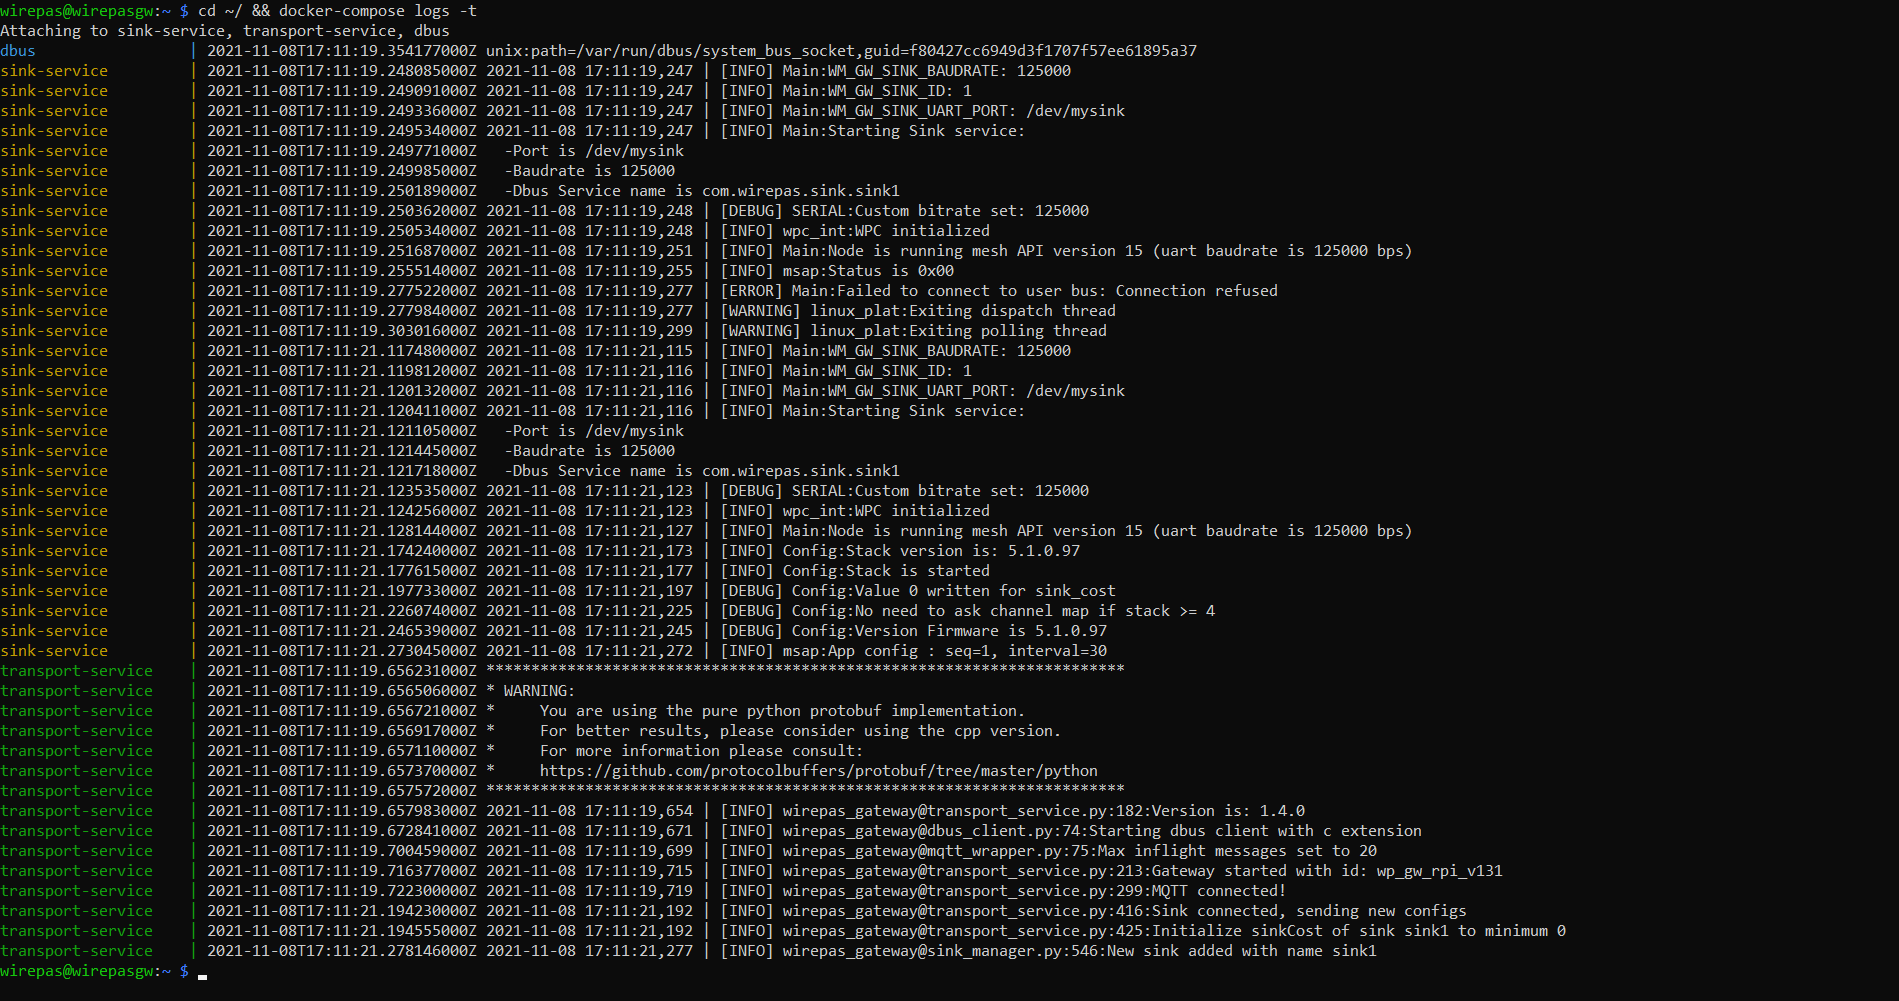
- to get additional information (example screenshot listed below) you can look at the containers logs with
cd ~/ && docker compose logs -t
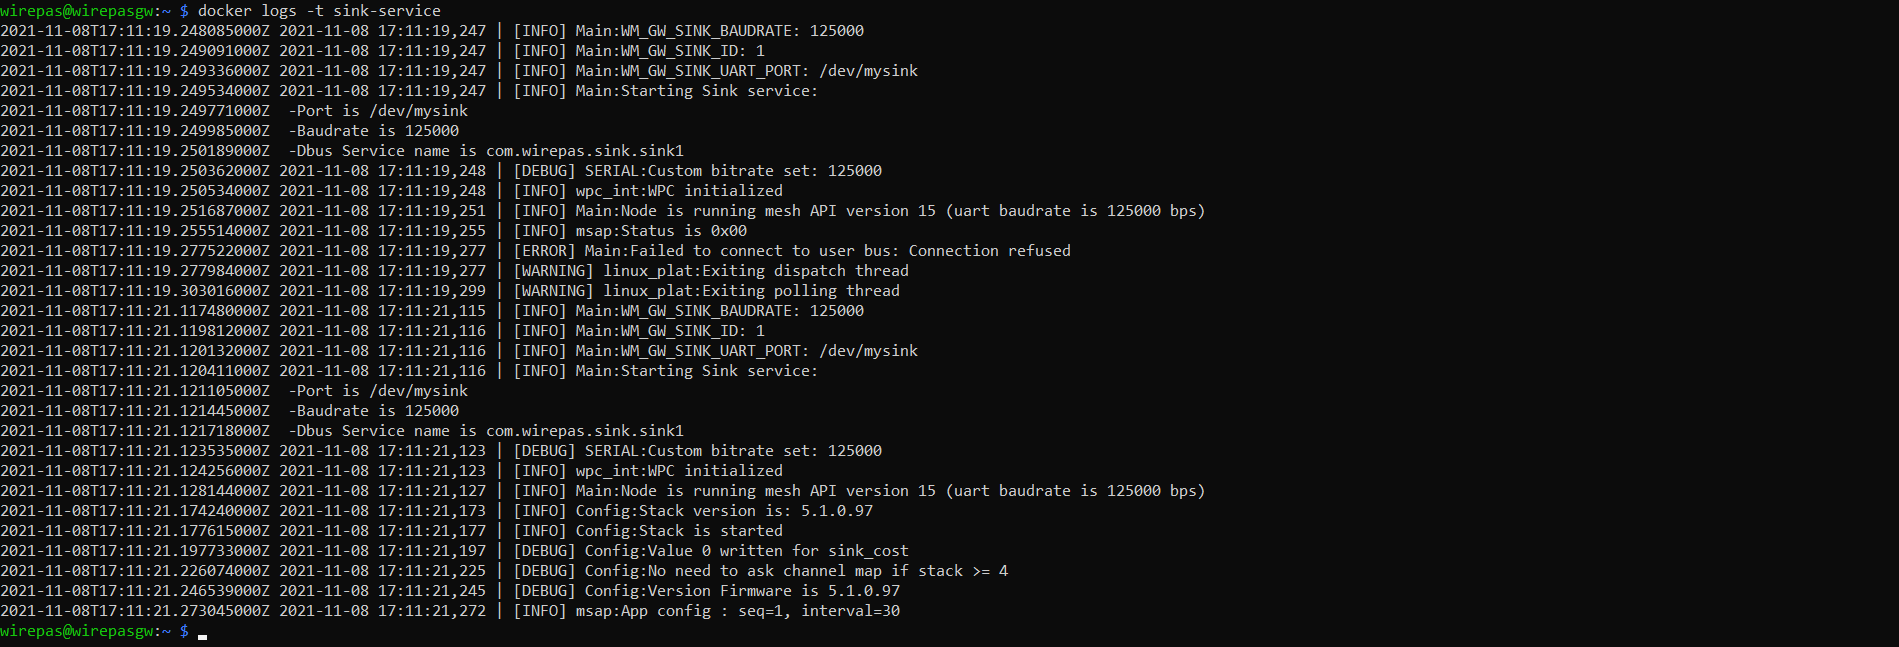
Note: if you want to see the logs for a specific containers you can use
docker logs -t <container name>
where <container name> is sink-service or transport-service
to redirect containers logs to a file (e.g if contacting Wirepas support) the command to use is
docker compose logs -t --no-color > <output filename>
If the Sink service is not running in docker ps results, check your port configuration, it is usually because of improper /dev/tty selected or link speed.
- To easily check the port, unplug the sink, plug it back and run the following command:
sudo dmesg
There you will see what was the name given to your sink by Linux. Please, if necessary, update WM_GW_SINK_UART_PORT in gateway.env file.
- If transport service is not running, check your MQTT settings. You may also face issue with Firewall settings, you can use local MQTT broker to simplify the setup.
- Finally, in case your device are not always enumerated the same way you can refer to the following tutorial to create a rule in Linux: https://github.com/wirepas/gateway/wiki/How-to-ensure-a-constant-enumerated-name-for-a-USB-sink
How can I check the sink parameters ?
Yes, just connect to the Raspberry Pi console (SSH or screen) and enter the following command:
docker run --rm -v wirepas_dbus-volume:/var/run/dbus wirepas/gateway_transport_service wm-node-conf list
Here is below an example of what is returned by the command. Among others, you can find the Nodes address, Network address, Network channel and stack version.
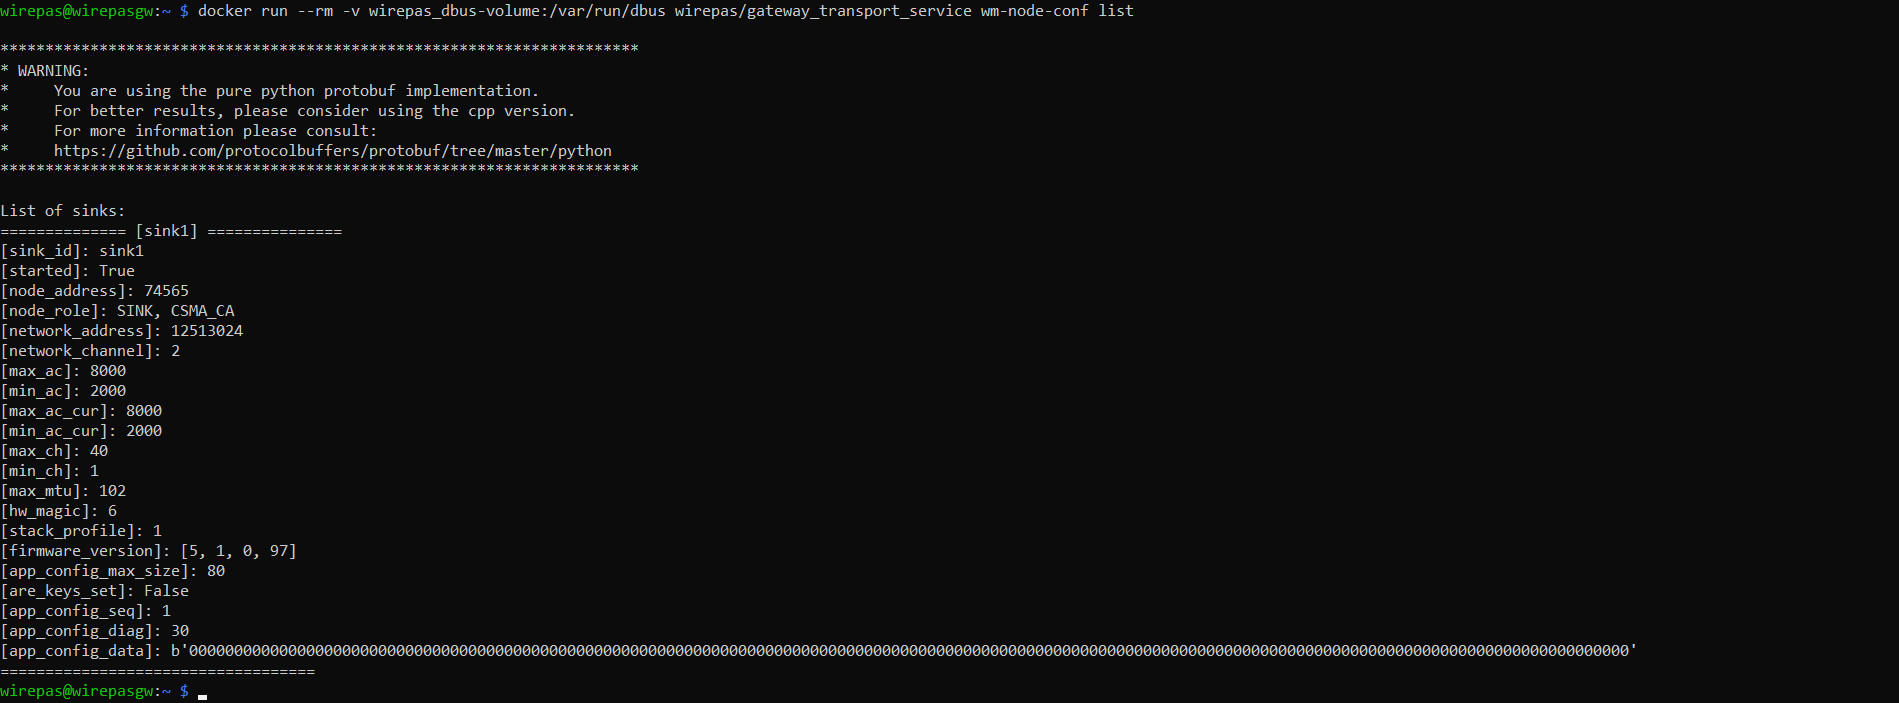
Note : the “Could not import WPE handles (No module named 'grpc')“ and the warning messages can be safely ignored.
Can I see the traffic coming from nodes in the gateway ?
Yes, you can print the traffic between the Sink service and the Transport service via the following command:
docker run --rm -v wirepas_dbus-volume:/var/run/dbus -ti wirepas/gateway_transport_service wm-dbus-print
Here is below an example of what is returned by the command.

Note : the “Could not import WPE handles (No module named 'grpc')“ and the warning messages can be safely ignored.
Can I install other stuff on the Raspberry Pi ?
Yes, the release is based on a Raspbian image. You can find more details about the installation scripts in the Github repository
It is working, am I good to go into the production ?
This pre-built images are meant for quick setup and are not designed to be product. Nevertheless the Wirepas Gateway drivers are available either as native or Docker component for integration in your production Gateway.
Revision History
| Date | Version | Notes |
v1.0 | Initial Version | |
v1.1 | Improved version. | |
v1.2 | Illustration updates and minor fixes | |
v1.3 | Updated links to Wirepas Terminal | |
v1.4 | Replaced reference to Wirepas Mesh by Wirepas Massive | |
v1.5 | Add automated installation error fix instructions | |
v2.0 | Pre-built images v1.3.x only added support | |
v2.1 | Corrected Promistel USB Dongle UART baudrate values | |
v2.2 | Updated:
Added comment to redirect docker containers log into a file with a human friendly format | |
v2.3 | Replaced references to “Wirepas Massive“ by “Wirepas Mesh“ Clarified sink UART baudrate selection with typical board hardware Removed references to Promistel’s Pi HAT and USB dongle, replaced by Nordic or Silabs dev kits Added support for RPi images v1.3 onward Removed support for older RPi images Replaced MQTT.fx MQTT client by Wirepas MQTT Console Tool Minor content fix | |
v2.4 | Replace WNT references with Wirepas NMS as new backend component |
Legal Notice
Use of this document is strictly subject to Wirepas’ Terms of Use and Legal Notice.
Copyright © 2026 Wirepas Oy