Status | Date | Doc Version | Applicable | Confidentiality |
RELEASED | 23 Mar 2026 | v1.2 | Wirepas Massive v5.x | PUBLIC |
Wirepas will end support for all the versions of the Wirepas Network Tool (WNT) and the Wirepas Positioning Engine (WPE) as described in EOS document. WNT and WPE might be referenced in this document until the EOS period; however, existing WNT deployments should plan their migration to Wirepas Network Management System (NMS). WPE is not included in Wirepas NMS. For guidance on positioning during the NMS transition, see the Wirepas Positioning Application Note for NMS. |
Introduction
The document gives details on how to integrate and use Wirepas Positioning into a smart tracking project.
It walks you through the different steps from evaluation to deployment and points you to the right detailed documents describing the Wirepas Positioning system overview, the evaluation kit, the backend APIs, and the installation guidelines.
The targeted audience are System Integrators willing to integrate the Wirepas Positioning backend inside their platform.
What you’ll learn
- What are the different ways to engage with Wirepas on a Smart Tracking Project
- What are the different options to integrate Wirepas Positioning backend into your system
- What API documents are available for your backend integration project
- What other documents to use to learn how to:
- Upload a floorplan
- Get the list of connected nodes
- Place an anchor on the floor plan
- Get the position of a moving asset
- Configure the assets reporting frequency and motion parameters
What you’ll need
Even if it is not mandatory, you will preferably need a basic understanding of Wirepas Mesh. For further information on Wirepas Mesh, please refer to Wirepas Mesh Concept document [1].
An understanding of Wirepas positioning system and its components is required. Please read Wirepas Positioning system Overview [2].
Wirepas positioning system overview
Wirepas Positioning system Overview [2] gives an introduction to Wirepas positioning system, explains how it works and which building blocks it includes.
The document first explains which tracking applications Wirepas Positioning system is well suited for. Then, it covers the different components provided by Wirepas to build a Smart Tracking system.
How to engage in a Wirepas Positioning project for a System Integrator
Integration of a Wirepas Positioning projects requires to integrate two main components:
- Software integration: You will integrate Wirepas Positioning backend in your platform. This document guides you how to do it.
- Hardware integration: You can contact Wirepas tag, anchor and gateway vendors and select the devices that fit your use cases (see Wirepas Partner page) - Wirepas sales team is available to guide you through your selection.
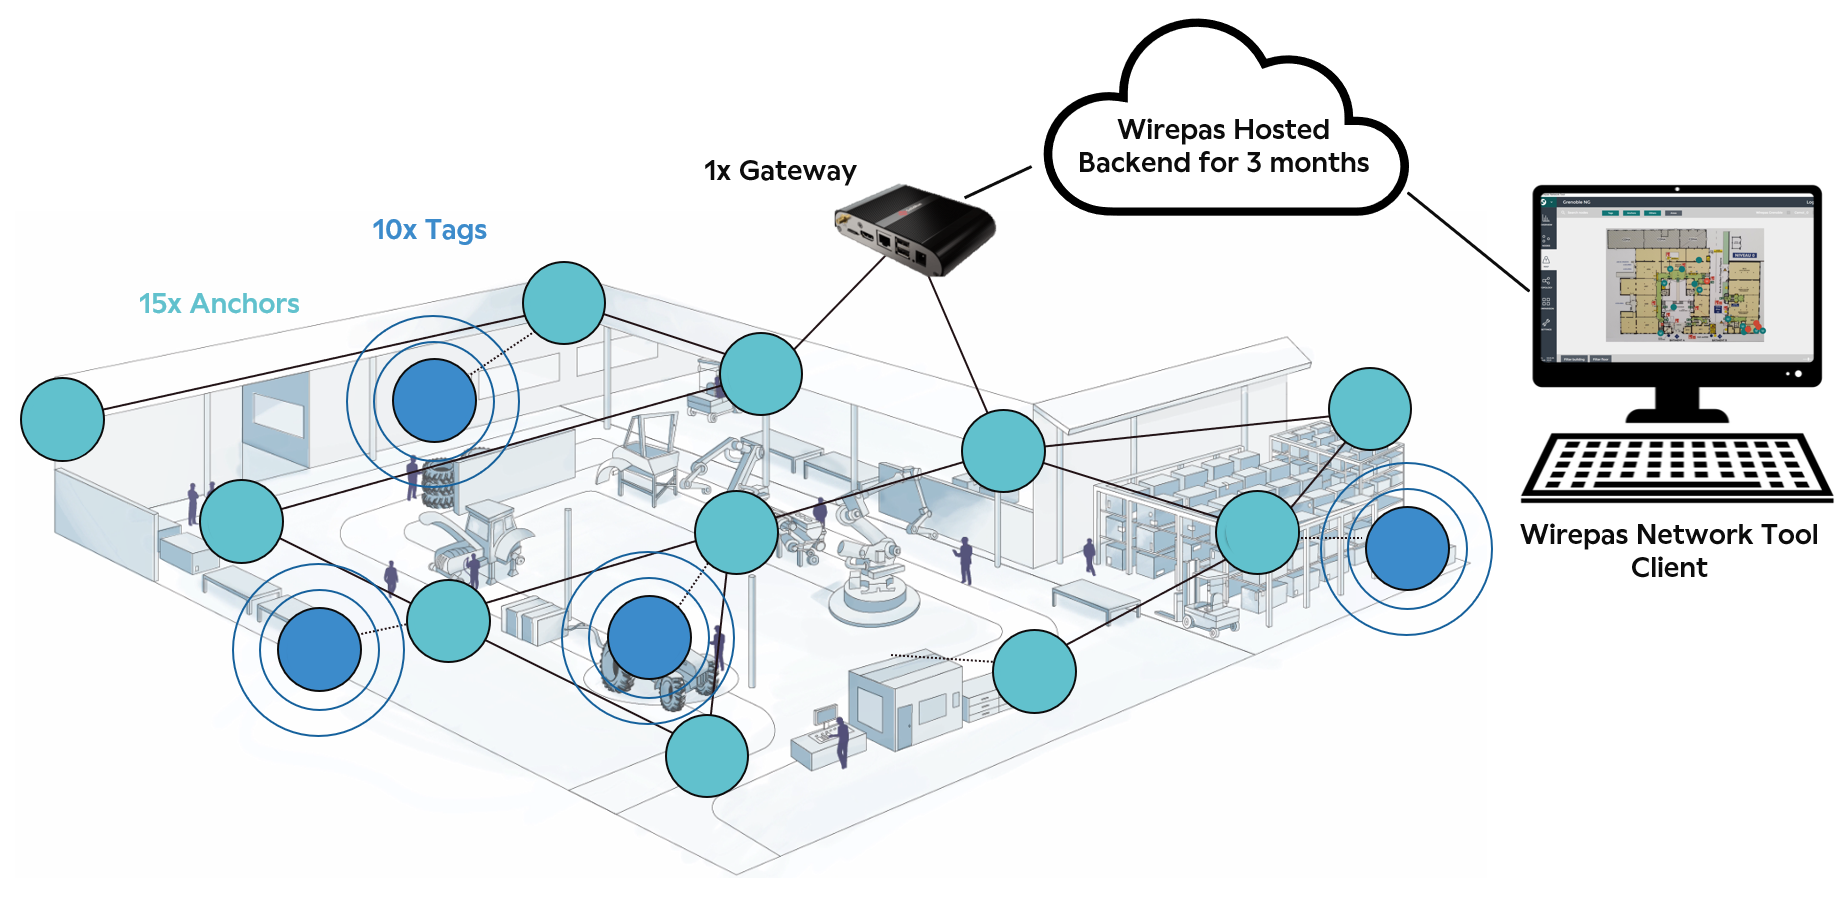
As a reminder, the figure below summarizes a typical Wirepas Positioning System:

A typical Wirepas Positioning project requires the following steps
- Step 1: check the fit for your use case. The first step is to check the technology fit for your use case: in smart tracking, there is no “one size fits all” technology. In order to determine if Wirepas Positioning is the right technology for your use case please refer to Wirepas Positioning system Overview [1]. Wirepas Sales and Customer Success teams can also assist during this phase if a confirmation is required.
- Step 2: Get started with Wirepas Positioning with an evaluation kit [3]
- Step 3: Install the Wirepas Positioning Backend in your own backend architecture
- Step 4: Integrate the Wirepas Positioning Backend inside your own backend architecture
- Step 5: Dimension your project to identify how many Anchors, Gateways will be required. Please refer tot the Wirepas Positioning Dimensioning guide [4] to properly dimension your project.
- Step 6: Source tags, anchors and gateways from Wirepas ecosystem partners.
- Step 7: Install the system at your (or your customer’s) facility / building / hospital / farm… Configure your backend - input floorplans - define network parameters . For this step please refer to the Wirepas Positioning Installation guidelines [5].
Note: A Wirepas Tools License is required for steps 3 onward.
Steps 2 to 4 are usually done once during the integration of Wirepas Positioning Backend into System Integrator backend. In the next sections we will cover steps 2, 3 and 4 related to the Get started and the integration.
Step 1: Check the fit for your use case.
The first step is to check the technology fit for your use case. In order to determine if Wirepas Positioning is the right technology for your use case please refer to Wirepas Positioning system Overview [1]. Wirepas Sales and Customer Success teams can also assist during this phase if a confirmation is required.
Step 2: Get started with Wirepas Positioning with an evaluation kit
The evaluation kits allows to understand how the system works, its performances and how to configure and install a Wirepas Positioning solution.
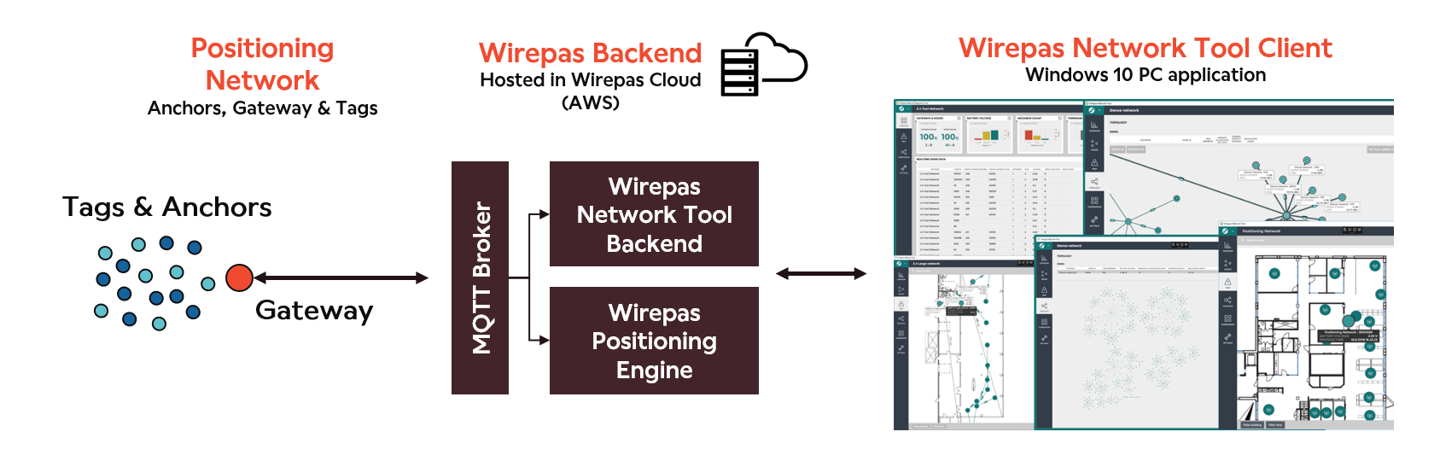
To get started with Wirepas Positioning, you need to have Wirepas programmed hardware (tags, anchors and gateway) and hosted WPE and WNT instances. You can order a kit from our partners if available. When the kit is ordered, Wirepas creates and hosts WPE and WNT instances for the duration of the evaluation, and you have access to Wirepas Network Tool Client software.
Once you are familiar with the Wirepas Position kit, you can use the setup to start the API integration in your backend system.
For your commercial deployment you need to install and run your own instances of WNT and WPE in your cloud (or on-premise) infrastructure. This installation will be described in the next section.
Step 3: Install the Wirepas Positioning Backend in your own backend architecture
Now that you are familiar with the overall architecture of the Wirepas Positioning system, it is time to install your own Wirepas Backend.
The diagram below reminds the various building blocks of a Wirepas Positioning system and their features. The Wirepas Backend consists of the MQTT Broker, the Wirepas Network Tool (WNT) backend and the Wirepas Positioning Engine (WPE) backend. The APIs offered by Wirepas Backend will be described in Step 4: Integrate the Wirepas Positioning Backend
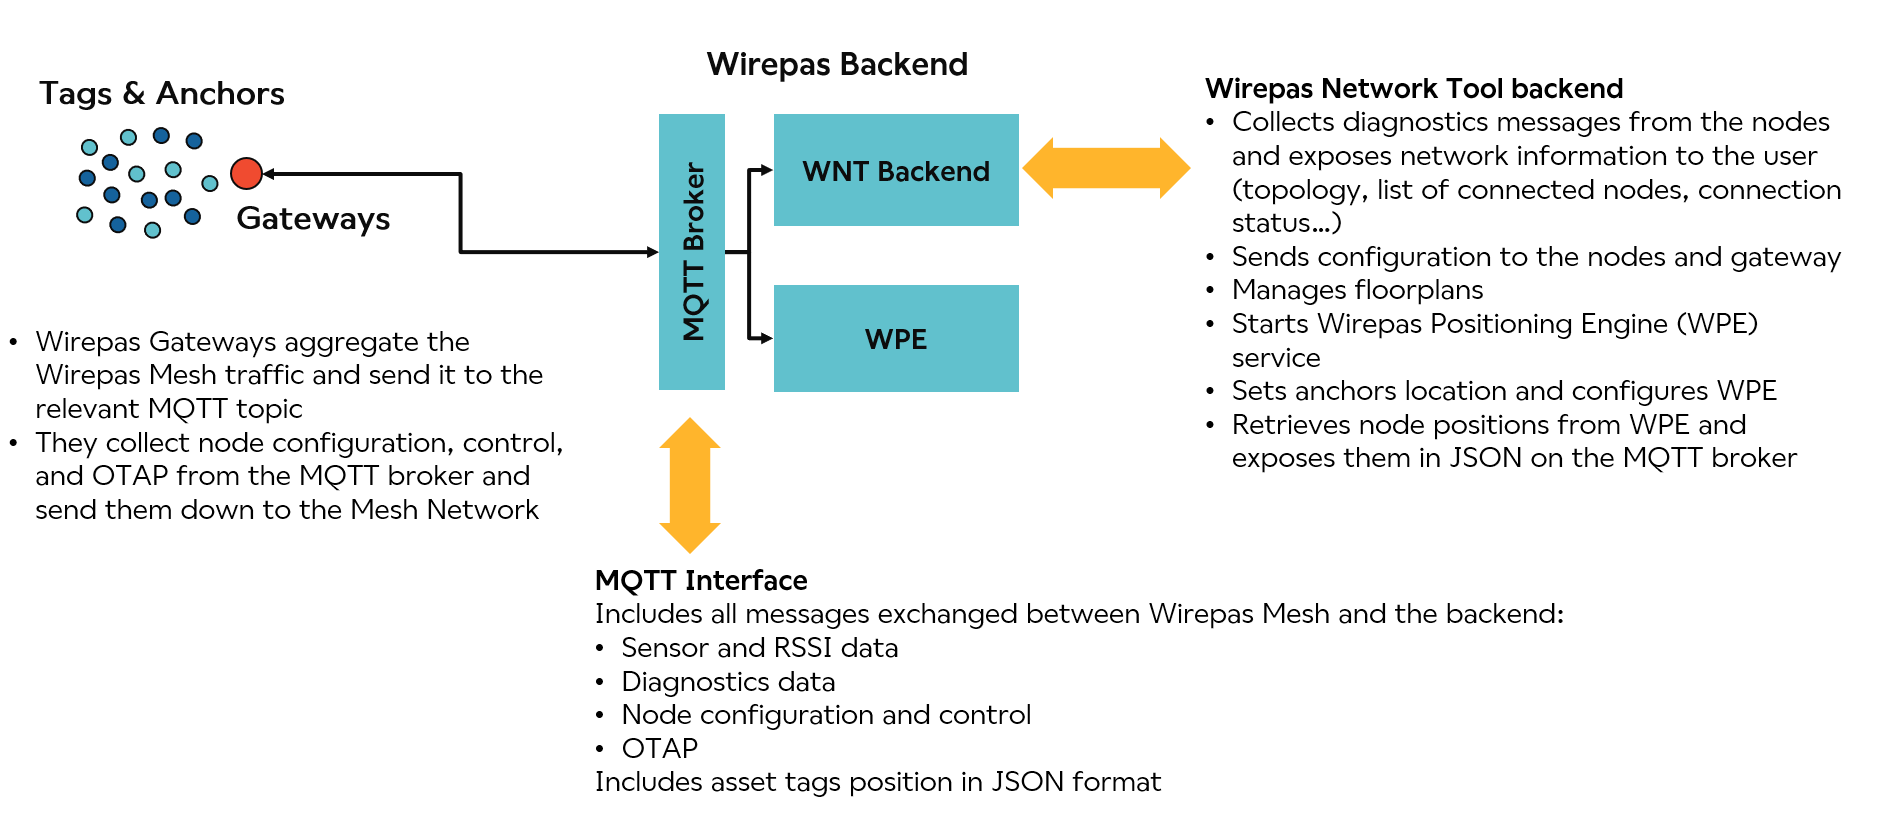
The Wirepas Backend consists of a set of Docker containers running on a Linux machine. This server can operate either in a cloud architecture or locally for on premise installation.
The Wirepas Services Installer User Guide [6] document describes the steps to create your own instances and install them in your server.
Notes:
- Even if On Premise installation are possible, the installation scripts requires by default an internet connection to pull the Docker images from Wirepas repository.
- The backend does not requires any connection to Wirepas servers once installed.
Note: by end of August 2026, we will stop proposing WNT and WPE (replaced with NMS).
Step 4: Integrate the Wirepas Positioning Backend
Now that you have a functional Wirepas Positioning Backend, the next step is to integrate the Wirepas Positioning Backend with your own platform via API.
The integration can be divided in 2 parts:
- Getting the positioning system configured where 2 options are available
- Getting the position and optionally some sensors data from the system.
Wirepas Positioning backend architecture:
The picture below describes the overall Wirepas Positioning Backend and the main APIs
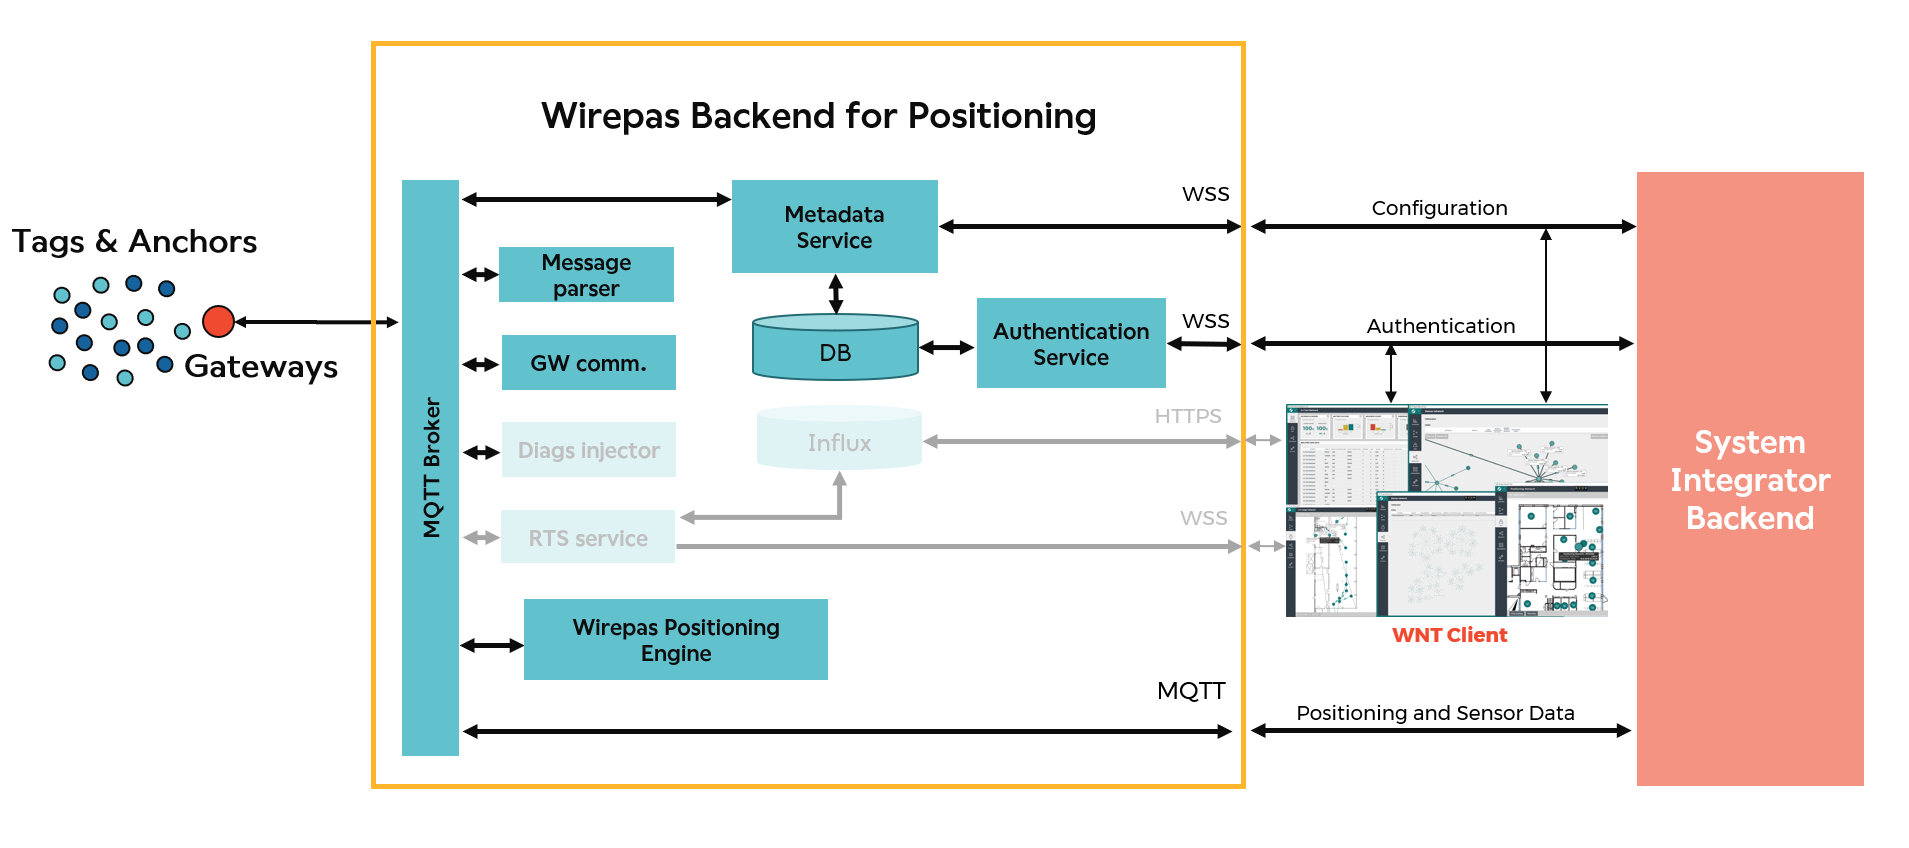
The Wirepas Positioning Backend consists of the Wirepas Network Tool backend and the Wirepas Positioning Engine. All components are connected to a central MQTT broker. All the gateways in the system are connected to this central MQTT broker.
The WNT APIs are described in WNT backend API document [7] here is a summary of the 3 key APIs to be used for a Positioning backend integration:
- Authentication : Authenticates the customer service using user name and password combination, and returns a token that is used for communication with the metadata and real-time data Web-Socket services.
- Configuration Metadata manager used to:
- Create, update and delete operations for floor plans, nodes and areas.
- Configure Anchors position
- Set and update Application data configuration to configure Tags and Anchors
- MQTT Interface used to get the position updates using the MQTT WNT JSON API in real time using a subscribe mechanism.
- The WNT API also includes the Realtime situation manager and Time series database which are usually not used for positioning applications integration but are used to communicate with the WNT Client.
In addition to the WNT API, the MQTT broker is also used to collect all non position data optionally coming either from Tags and/or sensors in the network. This API is called the Wirepas Backend API and consist on a MQTT interface with a Protocol Buffer encoding. The API is described in Wirepas Github.
Summary of the API to be used for integration
API Name | Protocol & Encoding | Used for | Credentials to be used |
WNT Authentication | Web Socket / Json | Initiate connection to the backend to use Metadata service | WNT Credentials |
WNT Metadata | Web Socket / Json |
| Token from the WNT Authentication |
WNT MQTT | MQTT / Json | Get updates from Tags and Anchors:
| Backend: mqttjsonuser |
Gateway API (Optional) | MQTT / Protobuf | Get and send all the data coming from the network gateways:
| Backend: mqttlibraryuser |
About WNT Client
You can use the Wirepas Network Tool client [8] to:
- Import your floorplans and locate them on the World map. [9]
- Check the network topology and get the list of connected nodes
- Drag the anchors to their position on the floor plan
- Visualize the asset tags position and get other status information (battery level, signal quality…)
WNT Client is not intended to be used by end users but can be used as an installation tool (see option2)
Note: WNT Client is a Windows application and is not multi-tenant. It means that it is not possible to create isolation between several networks via different users. For sake of clarity the Wirepas Positioning Backend can be deployed in a multi-tenant environment.
Configuring the positioning system
There are 2 main options to configure the Positioning Backend depending how you prefer to configure the system, configuring the system essentially covers the configuration of the Anchors position and optionally the creation of floorplan and zones.
The 2 options are described below:
- Configure the system via WNT API
- Configure the system via the Wirepas Network Tool Client.
Option 1: Configure the system through WNT API
In this option, you want to configure the Wirepas Positioning system from your platform. It means your platform already includes the floorplans or the map of the site and has the possibility issue commands to place Anchors on the map. Your platform will declare and configure the Anchors in the Wirepas backend system using the WNT API [7].
The picture below describes the Configuration interface to create, configure and update the Anchors and tag configuration - this is using the WNT API (Authentication and Metadata services) :
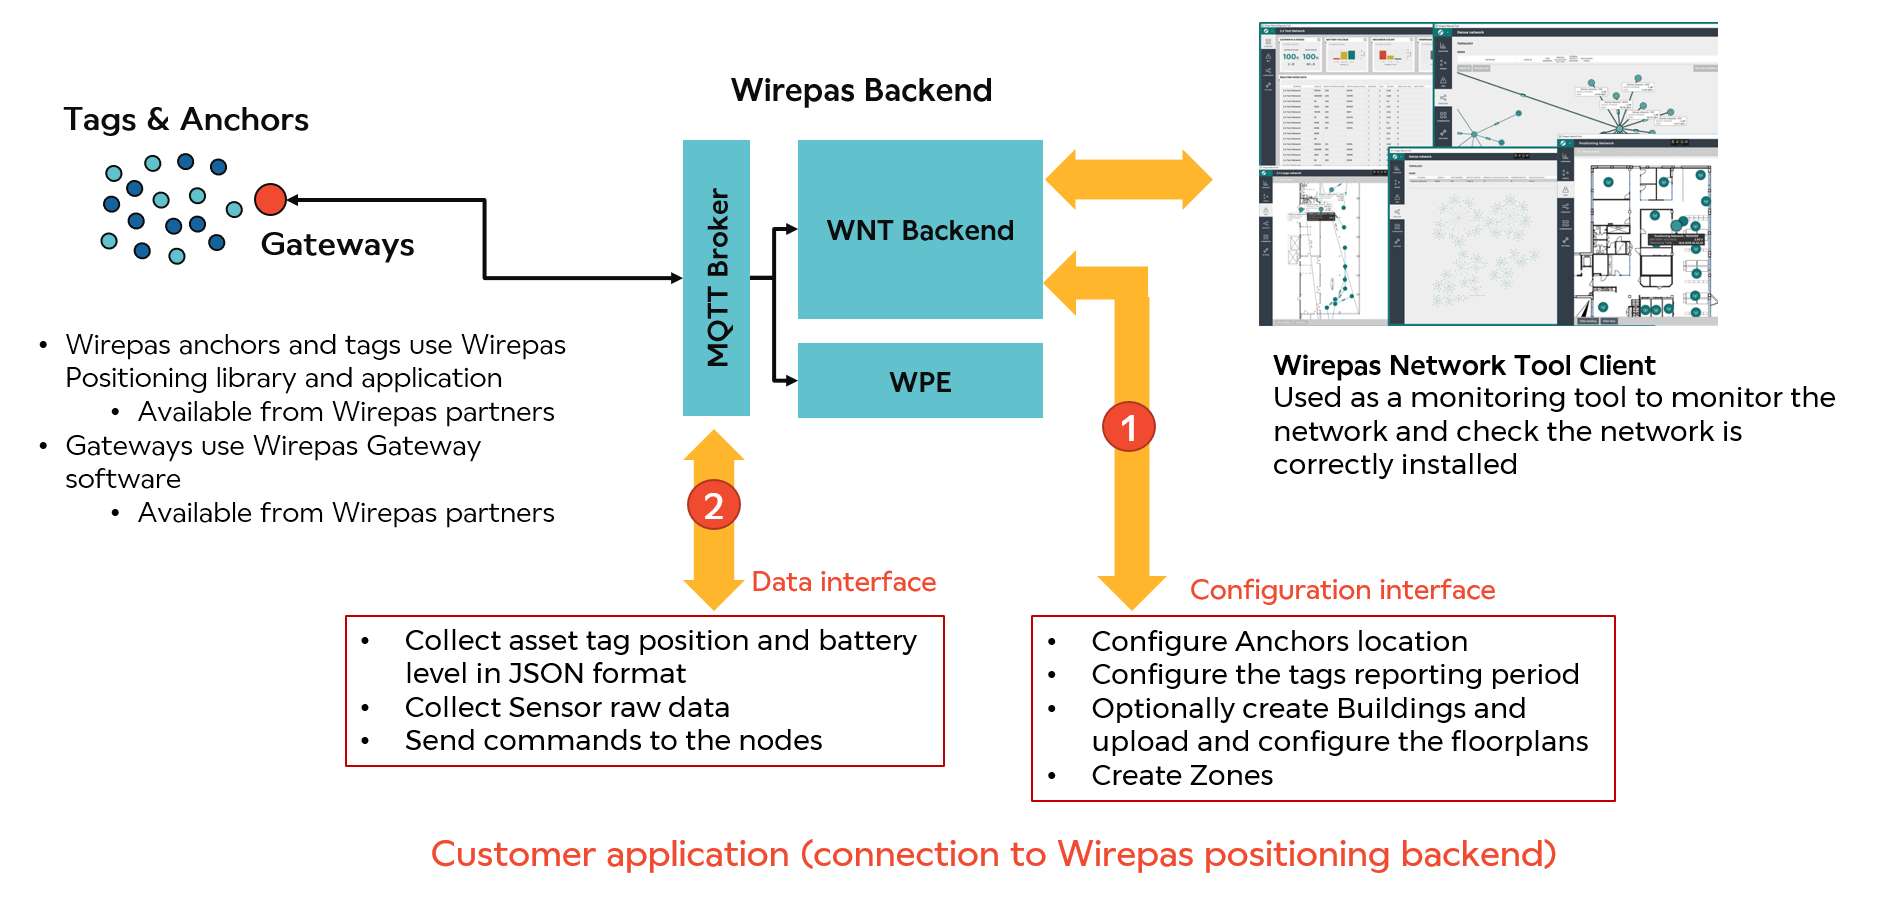
In this option the Wirepas Network Tool Client can optionally be used to monitor the network and check that the installation is properly done. In addition, the customer application can also inject these floorplans and create areas (zones) in WNT backend to ease the visualization of the network in WNT Client.
Option 2: Configure the system with Wirepas Network Tool Client
In this option the Wirepas Network Tool client is used to configure the system and place the Anchors on the floorplan. This option minimizes the integration effort at Customer backend level, keeping the system configuration in WNT Client. The Customer application focuses on getting tags position and status updates.
The picture below describes the Configuration interface to configure Anchors and Tags and optionally get the floorplans - this is using the WNT API (Authentication and Metadata services) :
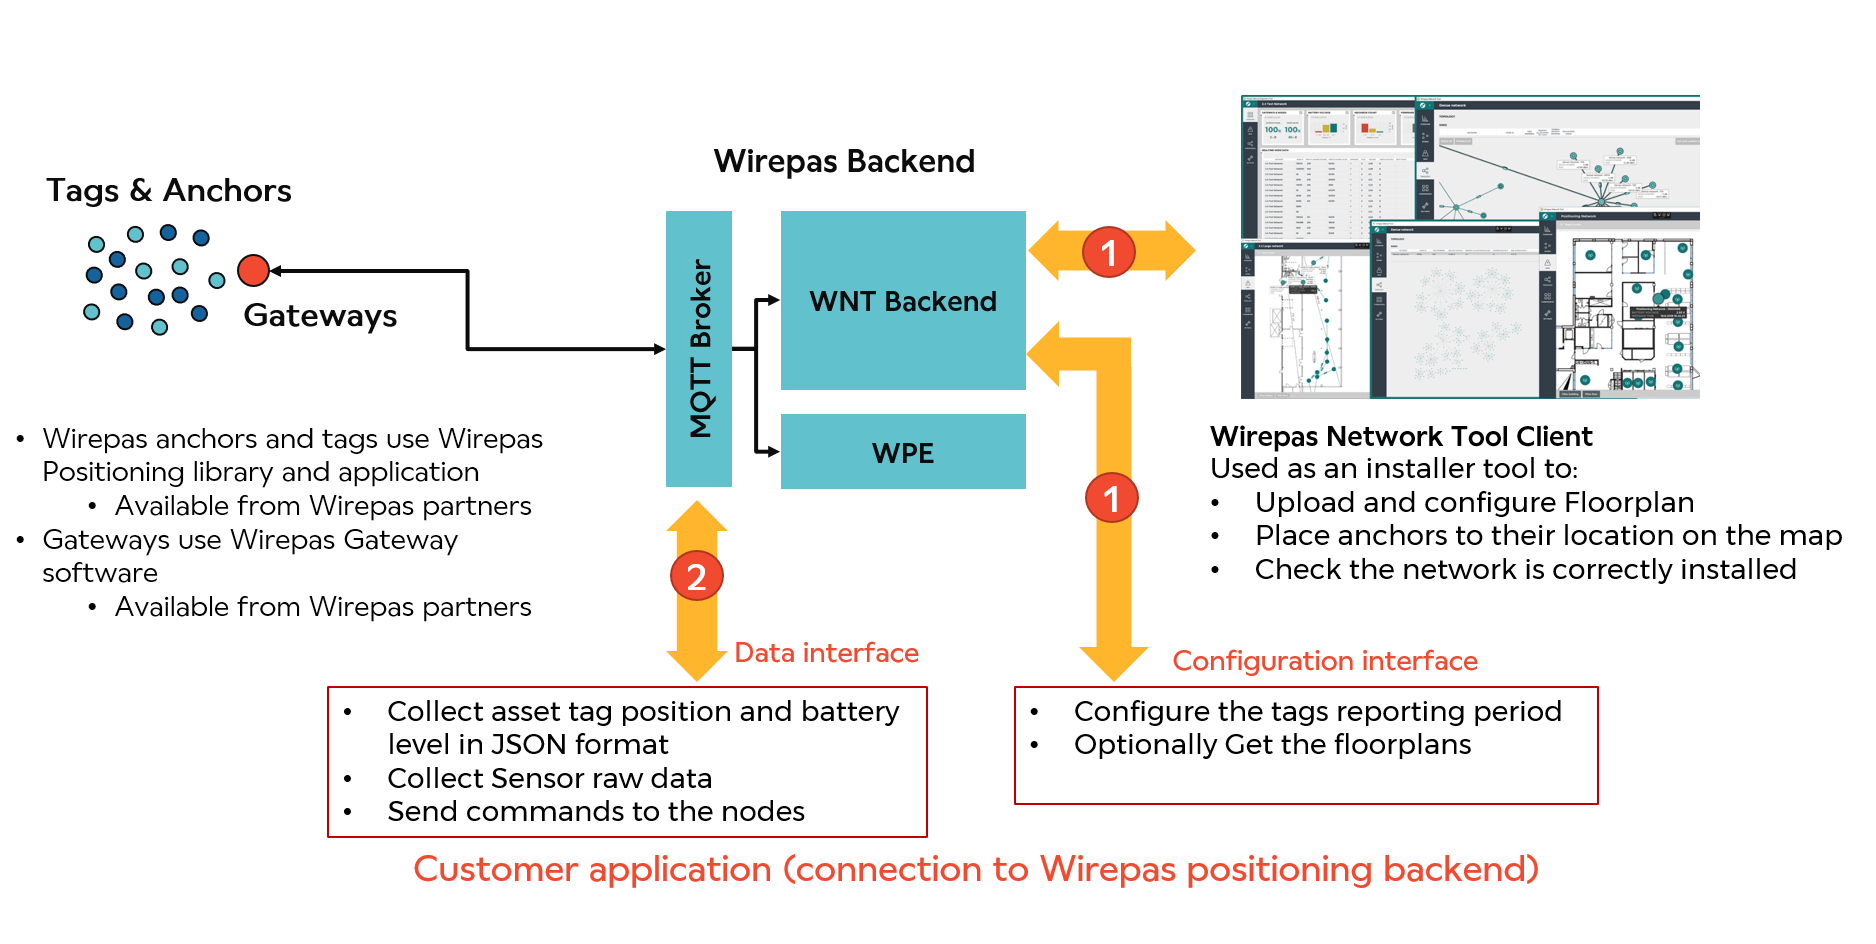
In this case, the floorplans are created in the WNT Client, you can refer to the following document to assist on Floorplan creation and Anchors placements:
- How to create and configure a building floorplan in WNT client [9]
- How to place anchors and tags on a building floorplan in WNT client [10]
The customer application can either have a replica of the floorplan or directly pull the floorplans from the WNT Metadata API.
Note on floorplan consistency
Floorplans are used in customer visualization system to display the asset tags on the user screen, they are also used by WNT backend to report positions. The two views of the floorplan need to be consistent so the location information (pixel position) reported by WNT backend in JSON form (see below) can be directly useable by the visualization system.
Coordinate conversions
When a floor plan is added into WNT it is required to input the latitude/longitude/altitude (WGS84) of four reference points (A, B, C, D) and a scaling value. It is important to follow the guidelines described in the Coordinate conversion section in WNT backend API document [7] to insure a correct WGS84 to pixel conversion. The section provides the details of:
- WGS84 to pixels conversion
- Pixels to WGS84 conversion
Getting the position and optionally some sensors data from the system
Once the system is configured, the next step is to get the updates from the Tags and Anchors.
The Wirepas positioning backend offers an easy to use MQTT JSON APi to get all the real time data from the backend. Obviously all Tags positions changes are available on this API together with all important information for integration.
Among them we can list:
- For Tags:
- Tag address & network address
- Positions in WGS84 with timestamping
- Building, floors and Zones indications (if used in your platform)
- Battery voltage
- For Anchors:
- Online status
- Anchor address & network address
- Battery voltage
By default, the WNT Backend will publish the update on the topic node_data_json. To get the position, your application needs to subscribe to this topic. Updates are provided in JSON format as described below:
{
    "version": 1,
    "nodes": [{
        "network_name": null,
        "node_name": "",
        "is_approved": true,
        "is_virtual": false,
        "online_status": 2,
        "online_status_string": "online",
        "voltage": 2.99,
        "latitude": 45.1853142,
        "longitude": 5.7051678,
        "altitude": 0,
        "position_pixel_x": 2006.65,
        "position_pixel_y": 1122.02,
        "position_meter_x": 68.68,
        "position_meter_y": 38.4,
        "positioning_role": 2,
        "positioning_role_string": "tag",
        "measurement_time_epoch": 1610623821195,
        "measurement_time": "1/14/2021, 11:30:21 AM",
        "positioning_time_epoch": 1610623829434,
        "positioning_time": "1/14/2021, 11:30:29 AM",
        "building_id": "96531a00-dc8c-23d0-b22e-458c82186aeb",
        "building_name": "NEW BUILDING",
        "floor_plan_id": "863f8c38-4bc4-46db-3a3a-878eb6c272c2",
        "floor_plan_name": "Cemoi_RDC",
        "areas": [],
        "node_address": 12678901,
        "network_address": 9747865
    }, {
        "network_name": null,
        "node_name": null,
        "is_approved": null,
        "is_virtual": null,
        "online_status": 2,
        "online_status_string": "online",
        "voltage": 3.04,
        "latitude": null,
        "longitude": null,
        "altitude": null,
        "position_pixel_x": null,
        "position_pixel_y": null,
        "position_meter_x": null,
        "position_meter_y": null,
        "positioning_role": 1,
        "positioning_role_string": "anchor",
        "measurement_time_epoch": null,
        "measurement_time": null,
        "positioning_time_epoch": null,
        "positioning_time": null,
        "building_id": null,
        "building_name": null,
        "floor_plan_id": null,
        "floor_plan_name": null,
        "areas": [],
        "node_address": 5451632,
        "network_address": 9747865
    }]
}
In the example above both a Tag and an Anchor are provided to the first thing to do is to filter Tags and Anchors based on the field positioning_role or positioning_role_string
Configuring asset tags from WNT backend API
Wirepas asset tags can be remotely configured from the server in order to:
- define or change the asset tag’s operating mode (Tag or anchor, Non-router Long Sleep, or autoscan) - see below and more details in Positioning Library reference document [11]
- set the measurement rate when the node is static, moving or offline(reporting frequency)
- enable or disable BLE beacon broadcast
- changing device class
The mechanism to remotely set the configuration of asset tags uses the Application data configuration packet (AppCfg). The application configuration data is persistent global data which is available to the whole network. Application configuration is sent from the backend (WNT backend) to all the gateways after which it is disseminated to the whole network and stored at every node. The format of the AppCfg data for the positioning application is described below.
Whenever an asset tag joins the network, it receives the data from its neighbors without the need for end-to-end polling.
In order to write an AppCfg packet to the network, WNT backend API [7] should be used (see Set network data method)
- an example of usage is provided in application configuration python example [12]
The AppCfg format is described in the Positioning library reference manual [11]
Deliverables for system integrators
Wirepas Positioning system package includes the following deliverables available under license with Wirepas
- Wirepas Network Tool and associated client (version 4.0.0 or later)
- Wirepas Positioning Engine (version 1.4.0 or later)
- Backend installer tools supporting both Cloud and On-Premise deployments
- Documentation and example scripts which can be used as examples for your system integration
Indicative list of Wirepas partners in Smart Tracking
Below list is an indicative list of Wirepas partners in smart tracking applications. Refer to Wirepas Partner page and to get the list of System integrators, you can choose System Integrator / Solution Provider from the CATEGORY and then choose Smart Tracking under the OFFERING.
References:
[1] Wirepas Mesh Concepts
[2] Wirepas Positioning system Overview
[3] Wirepas Positioning kit getting started manual
[4] Wirepas Positioning Dimensioning guide
[5] Wirepas Mesh Smart Tracking Installation guidelines
[6] Wirepas Services Installer User Guide
[7] WNT4 backend API
[8] Wirepas Network Tool Client User Guide
[9] How to create and configure a building floorplan in WNT client
[10] How to place anchors and tags on a building floorplan in WNT client
[11] Wirepas Positioning Engine Reference Manual v1.5
[12] Python example : Application Configuration
Revision History
Date | Version | Notes |
1.0 | Initial version | |
1.1 | Links missing fixed | |
1.2 | Remove obsolete links |
Legal Notice
Use of this document is strictly subject to Wirepas’ Terms of Use and Legal Notice.
Copyright © 2026 Wirepas Oy